Showing posts with label 3D printing. Show all posts

Wednesday 21st August 2024

Stephen had produced two more TV aerials and so a discussion continued as to which houses would receive them. Originally, the scruffiest house had the only aerial, but it was decided to plant the three  BBC/ITV aerials on the smarter houses and produce a BBC aerial (H grid only) for the scruffy house. Additional magnets were glued into the rear of the chimney stacks, and Stephen will make the earlier/simpler aerial for the remaining occupied house.


The bike was glued in its chosen location.


The pigeons were given a few painted highlights to create a more realistic effect.


Geoff had found some more people and animals and did a combined print run. However, they were a bit small, so an adjusted batch were also printed, which were much better: The dogs cats and rabbits were cute! Geoff still seeks out figures to bolster the Opening Day crowds on Worton Court. Parent and child combinations featured in the latest batch.


The method of printing is always a strange affair, with all of the support rods making a rather macabre image. 


Wednesday 7th August 2024

Worklist:

Animals for the field and pallets for the yard.

Cows/bulls were ruled out. Goats were mooted, but apparently they can climb fences. Chris - operator and blog reader (yes, there are at least 2!) suggested donkeys. After some searching, Geoff found a 3D file of a donkey online. Getting the scale correct was difficult, but finally, he produced 2 options. The second was a slightly smaller and mirrored version of the first (Animals being printed upside-down for stability - see later).


Mother and daughter?

The daughter has a floppy ear.


It was noted that the support rods, when snapped off, left dimples in the smooth donkey skin, which normal paint did not 'fill'. Sometimes, small residues of the supports remain, but these can easily be filed off. Investigations required into detaching supports and/or filling dimples..

In order to cut down setting-up and packing-away time, we have generally been gluing down lots of the small features and Stephen made a start on the yard, gluing pallets together into blocks. Gluing onto the ground was vetoed for the time being, to keep our options open for additional items or alternative layouts.


Wednesday 1st May 2024

Worklist:
Fit new rainwater pipe.
Complete foliage around pipework (track leading to the fiddleyard).
Fit magnets to engine shed.
Add foliage to the long fence.
Add weeds to base of all buildings.
Assess the pallets and crates printed to date.

The third downpipe needed a double swan-neck, which Stephen fabricated from 4mm plastic tube. It took a fair bit of trial and error to get the joints correct, then a lot of filing to achieve the final shape. This was spliced onto 3+ lengths of 3D printed downpipe, and suitably weathered.


Main building cladding, windows and rainwater goods are all 3D printed.

Geoff continued to build-up the foliage on the pipework frame looping over the track going into the fiddleyard.


The engine shed is located over 4 vertical cocktail sticks, but is not fixed down, meaning it could fall off in transit. Rather than bolts, Stephen chose magnets - round magnets in a bucket (below) and rectangular magnets in a plasticard toolbox. Both were glued to the brick plinth with epoxy glue, 'diagonally opposed'. Countersunk holes were made in the plaster floor and 4mm screws inserted through to the plywood below. Both ends of the building were now perfectly held in place, but it can be removed for access to the lighting and the interior generally.


Geoff moved on to applying foliage to the long, bare Peco fence running up to the bridge. A variety of materials were used, starting with PVA, then a light spray of isopropyl alcohol diluted with water, which allowed to glue to spread more easily.


Both then moved on to applying small amounts of foliage along the bottom of the factory buildings and the cottages. Mostly subtle hints of weeds with occasional long grass clumps made from cut-down self-adhesive 'dots' of grass and a few electrostatic grass clumps.


Finally, an array of old 3D printed pallets was amassed, with many stacked and glued together to see how it might look. These were printed from drawings created 'in-house', but Geoff had also been experimenting with newly downloaded files, with varying success. Some of these included timbers which were far too thick to be used, often due to poor draughtsmanship. A selection of solid cases were also discovered which should make for an interesting yard. Geoff jokingly suggested that the front building could become a pallet/crate manufacturer. That's not a bad idea!


Stephen had made up one of the new flat wagons, but didn't have suitable wood for the decking and ends. Geoff had printed a few more wagons 'for homework' and supplied some of the basswood sheeting used on the prototype and the original stone wagons.


That water tower still needs a feed pipe!


The end of the layout
(so far....)


Wednesday 24th April 2024

Worklist:
'Show and tell'.
Fiddleyard storage shelf brackets.
Extra foliage.
Pipework.
Pigeons.
Yard clutter.

Both of us had 'homework' to display. Geoff had developed and made a new wagon for transporting large blocks of stone - a 3D printed, two-part chassis with additional timber detail. The Kadee couplings push neatly into the sockets. 


Stephen had added coloured track section markers to the control panel. Although newly purchased vinyl was used, the adhesive was not very strong, but it will be ok for the time being.


The main job of the day was to take a shelf support arm from a trestle and re-fix it to the new 4-leg framework. The shelf provides additional storage for cassettes adjacent to the fiddleyard. It normally comprises two hinged shelves, but only one could be fitted to the new frame, so a stop-end panel has been added.


More gutters and downpipes were added to the factory building.


Geoff had printed some pigeons - primarily to indicate the position of the magnet below the loading dock roof. The remaining pigeons were added to the parapet above. Barely discernible, they are a  nice addition, so a few more will no doubt appear in due course.


Geoff was finally able to strike the pipework foliage from the to-do list.


And another to-do was completed - a bare patch of ground behind the engine shed received some foliage as well.


The yard clutter has been a thorny issue for some time, but agreement was reached at last. 3D printed pallets, stoneware items and an early forklift truck would be used to populate the area.  Crates and loads will also be printed to carry the main products of paving slabs and architectural stone components.


Current stone wagon list and uses:

4/5 plank wagons will convey crushed stone direct from the quarry to the mainline interchange. The same wagons will convey waste stone from Edwards yard to the mainline.

2 plank versions of the 4/5 plank wagons (photo above) together with the new wagons will bring large slabs to Edwards yard.

4/5 plank wagons and vans will convey crated slabs and architectural stoneware from Edwards to the mainline.

Empties will return to the quarry and Edwards yard. Some movements will be with dedicated trains, but the addition of wagons to other trains 'en-route' is also anticipated, which should make for some interesting shunting!


Wednesday 17th April 2024

Worklist:
Fit a new controller socket on the main control panel.
Check-out the electrics on/in the main control panels.
Paint the backscenes.

Paul, another of our guest operators, made an interesting suggestion when he visited recently; why not add another socket for the handheld controller to allow a great extent of control along the layout? He was correct - our current socket was plugged into the left-hand end of the panel i.e. close to the end of the layout, whereas a socket at the other end (mid-way down the layout) would allow operators to move further down the layout - a 'no brainer'. A hole was drilled in the other end, another set of wires and socket was made-up and fitted. The new socket will be a great addition.


After making the changes, the main control panel was examined for potential failures. A number of issues were identified and rectified, which although taking longer than expected, left us with a lot more confidence in the system.

Some time ago, Geoff had 3D printed some ogee gutters and downpipes for the factory building, which Stephen had recently painted and weathered. Pre-glued in two sections, they were easily trimmed to length and glued in place. We were very pleased with the effect. Two other sets will be added elsewhere.


The layout was then taken apart and stored away. Some went into the main rack, but the two new boards went into their dedicated rack next door. However, the now completed cottages were too high for the designated space so a shuffle-round was required - but it all fitted - just.


The final job was to hoover everything as much as possible, set out all of the trestles and cover with newspaper. All of the backscene boards were then laid out, ready to be painted. To a half used tin of white undercoat, some grey undercoat (used on the baseboards and panel backs) was mixed in. Several existing boards had a creamy tinge, so some magnolia undercoat was also added. Eventually, all of the panels were painted. It looked good at the time, but we'll reserve judgement for when it has fully dried. 


Wednesday 10th January 2024

Worklist:
Trestles.
Engine shed windows.
Rainwater downpipes.
Paving.

The adjustable feet for the trestles were ordered and had arrived the following day. Unfortunately, they did not live-up to the superb delivery. The plastic end caps were poor quality and rotated freely, meaning the thread had to be held to facilitate adjustment (an annoyance). The threaded arms were not straight and needed re-threading. It was decided to substitute with our own M8 bolts and 3D print suitable feet. However, they were cheap and the finished items will be very satisfactory.


Geoff moved on to the two new trestle frames, the timbers for which were prepared the previous week. A lot of discussion took place regarding the additional timber blocks required, for at least one of the trestles, to take a new lighting pole. A reminder of how much 'infra-structural' work is outstanding.


The engine shed window glazing was reviewed and the heavy 'misting' caused by the superglue used to fix the glazing was a disappointment, but not wholly unexpected. Stephen applied a layer of water-based clear varnish noted for reducing the misting. The immediate effect was promising (below right), but after a while, the misting returned, albeit around 90% of the initial effect. 


Geoff had produced drawing files of the rainwater downpipes for the factory buildings and now ran-off as set, for appraisal.


They are a bit 'chunky', but are a great addition to the factories. Apparently, swan-necks below the gutters are beyond our draughtsman's expertise, but we should get over that by some heating or manual manipulation of a pipe section. Gutters next please Geoff.

The area in front of the office has been debated quite a bit. Geoff wanted the proposed paving slabs flush with the general yard, to allow vehicle access, but Stephen wanted a defined edge, preferably a kerb. A chamfered kerb satisfied both corners. The loading dock platform and step were glued down together with a thick card kerb strip, hardened with PVA. 2' x 3' card slabs of the same thickness were cut out and the surfaces 'hardened' with diluted PVA, to allow them to be finished/smoothed.


Wednesday 4th October 2023

Worklist:
Create ridge sheets for the engine shed and fix to roof.
Paint roof.
3D print house windows and door.
Investigate roof to stone wall lead flashings.

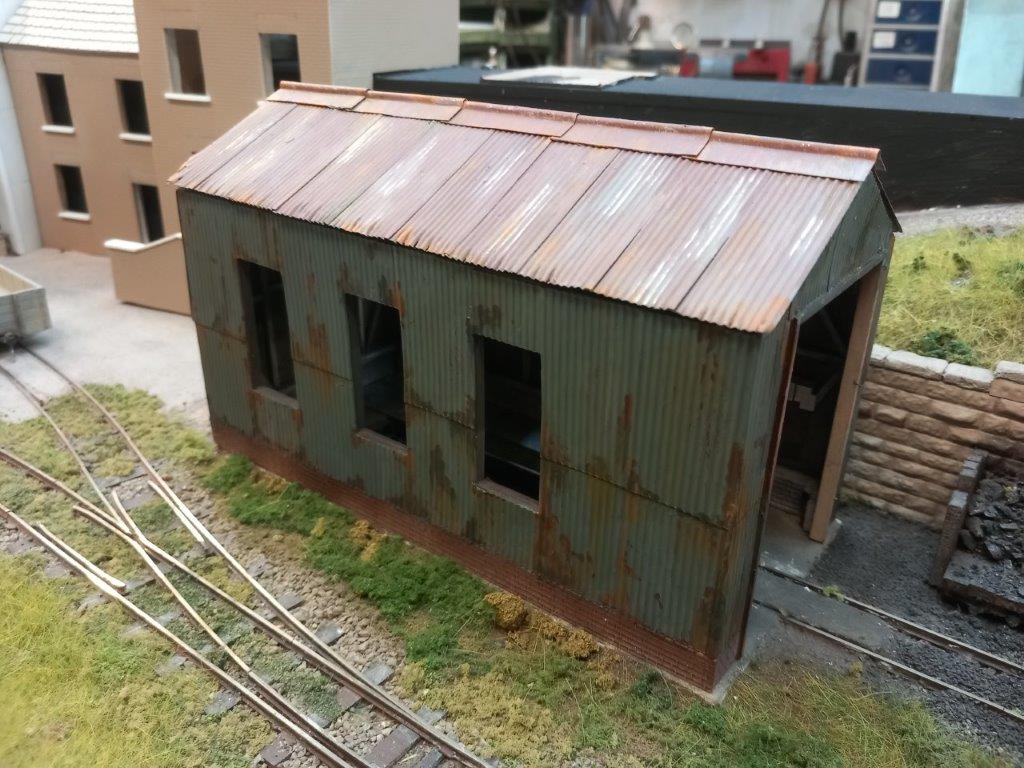
Geoff made the engine shed metal ridge units from thin aluminium sheet and glued them in place on the roof that Stephen had made many months ago. 


Geoff had produced a set of double-hung sash window parts and a front door for the smaller brick building.

Upper and lower sashes are glued back-to-back.

The parts required a small amount of fettling to fit, but looked great once in place.


Stephen spent the session cleaning up the ridge tiles on the cottages, but moved on to researching the lead flashings that would be required on each roof abutment. Some modern-day materials solutions would save some time, but wouldn't be right, so a long session of work was inevitable.


After looking at the interior of the cottages the previous week, it was decided that some wallpaper might be nice on the few areas where walls could be seen (the tunnel behind cuts most walls off). After some research and prep work, a few contenders emerged.

They will also be used in the house at the bottom of the slope. What about the office? More research.....