Wednesday 30th January

Worklist:
Backscene.
Fencing.
Lorry painting.

Stephen and Laurence clamped the assembled backscene panels to check the corner alignment, which was perfect.


Stephen and Geoff then drilled and fitted three 6mm Tee nuts for the end panel and secured it with flat-head screws and large, repair washers. It was very solid and the additional, slightly higher screws appeared to be unnecessary. 


Moving on to the back panel, fixing holes were marked out, together with cut-outs for the building light switches and the control panel hanger. The latter raised an unconsidered issue. Should the hanger be packed out by 6mm or should the packer be on the control panel hanger? The control box fixing has to work with and without the backscene, but we struggled to 'picture' the pros and cons, so we cut out the smallest hole to allow the back to be fitted, and fitted it.


Geoff had also been working on the fiddleyard end panel, fettling pieces of 9mm plywood and fitting then to form a ground into which the end board could be fixed. This is necessary as the end has to sit on top of the baseboards. Blocks were also fitted in strategic places for two levels of 'blind' fixings. Grass and foliage will be added to the plywood edge in due course. The end panel itself was cut from the wider strip ready to be shaped and fitted.


The wide back panel was cut to length and clamped in place. To our great relief, it fitted perfectly. S & G then walked up and down searching for the optimum sweeping profile to join the high and low levels. Finally, our resident artist Geoffrey Van Dyke, stepped forward to put pencil to board and it all came alive. We'll check that we still like it next week, then cut it, together with the various holes in the back, then fix it in place.


As previously discussed, we will also have a look to see if there are any benefits to gluing a strip a wood along the top edge, but considering the curved top, this doesn't seem feasible now. Once finished, all of the panels will be painted white.

Stephen, had finished painting the last of the cows and assembled the herd at the top of the hill. They looked really good.


Laurence had returned to repainting a proprietary lorry, which he'd disassembled and stripped off its original paint job. After cleaning all of the metal parts with isopropyl alcohol, he gave them a spay coat of grey primer.

Stephen continued with the new fencing along the track and made a timber gate for one of the openings.

Lots to do next week!


Wednesday 23rd January

Worklist:
Backscene
Review cows
Review signals

No meeting last week due to other commitments, but Stephen had purchased an 8' x 4' sheet of 6mm MDF and had it cut into three strips, as per the diagram shown on 19th December.


Eager to see what it looked like, one of the narrow strips was clamped in place.


Generally pleased with the effect, we looked at the end section. Whilst we had tentatively decided to put a 'return' on the end, now was time to confirm that decision. Using a sheet of thin card, an experiment was performed and the decision to form a return was unanimous. We had discussed the image to be applied to the backdrop many times and had finally agreed on a hand painted/sprayed light grey sky with a hint of clouds. The card is not far off the base colour, which will be directly applied to the board.


As described previously, the piers/capping stones of the wall pose a minor problem, as they overhang the baseboard; as to a lesser extent, does the rear gutter of the building. For the end and the length of the building, it was agreed to insert packer strips of 6mm MDF. Using clamps, we proved that the MDF can easily be curved back to the baseboard further along. Gluing the packers to the backdrop will also provide some support higher up the backdrop. The higher backdrop was then assessed by using the sheet of card again.


The wider strip finished nicely above the tree-top level. The top edge will be 'elegantly' curved down to meet the lower panel about 1/3 of the way along. As we had sufficient material to do both options, the next decision was to decide whether to have the backscene in two or three sections. Initially three, approx. 1m panels had seemed sensible, but seeing it all in place, two, 1.5m panels were agreed. For storage and transportation, two identical lengths made good sense and, after calculating the corner overlap and packer offset details, 2 x 1550mm panels were agreed. First the end panel was cut by hand, using a pull saw and the latest dust removal system....


Having cut the back panel to the correct length, the bandsaw was used to cut 100mm wide packer strips from the residue. We decided to glue and clamp the packers to the back panels for added strength and to leave a 'cleaner line' to the baseboards when no back drop was used. We also discussed the advantages of gluing a strip of wood to the top, rear edge of the panels to protect and stiffen them. A bit of experimentation required.


We then reviewed the fixings for the panels and quickly agreed on T-nuts into the baseboard frame. We also felt that fixings higher up, but below the hill profile could be useful. There was little structure in this zone, so Geoff carefully carved blocks of wood to suit various locations and glued them in place. Access to the back of some will allow further T-nuts, but some 'blind blocks' will require suitable 'glue-in' nut sockets - TBA. Although some loose electrical items need to be rewired/moved (like the generator sound unit speaker in the can-top) the 'natural' block spacing abutting existing thin ply webs, worked well. The wider block on the left is at the join between the two back panels.


The fiddleyard end was another matter as it required all fixings to be 'above board'. A gap had been left between the bridge construction and board edge. The 6mm end panel, flush with the board edge, left a space suitable for two 9mm ply 'grounds' to be fixed to the bridge itself and across to the back of the layout. This would allow the end panel to be fixed in place with multiple fixings.


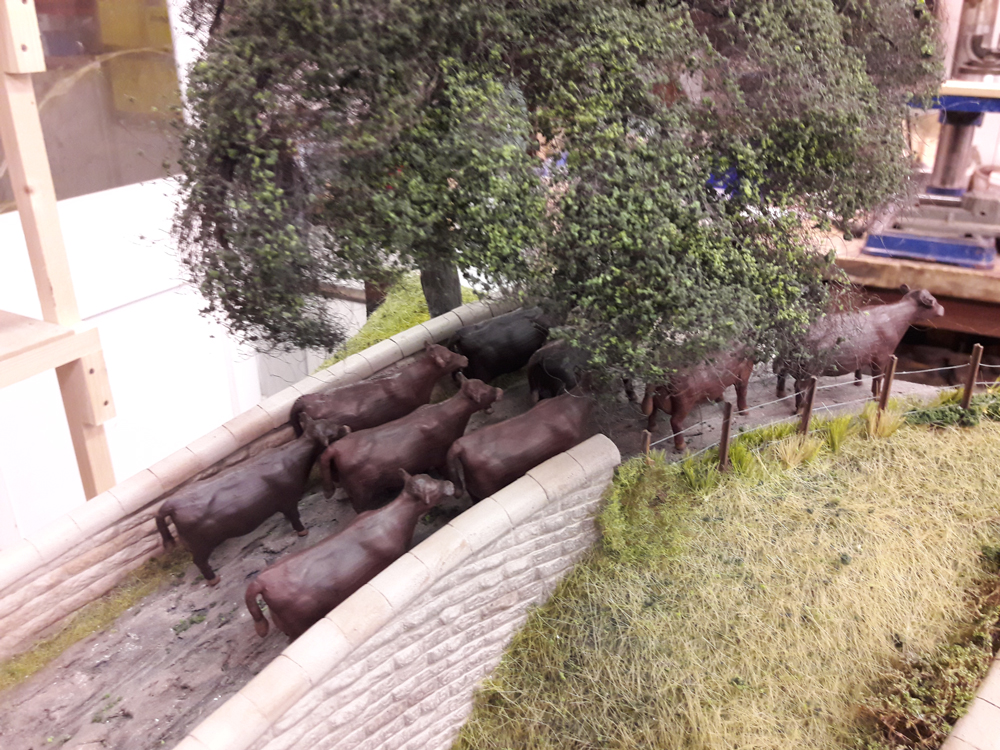
Stephen had brought along the 3D printed cows he'd painted at home. He'd found a full spray can of dark brown acrylic paint and so, instead of Herefords, he'd searched for brown cows and discovered some appropriate breeds such as Suffolk Dun and Red Poll. The cows, previously primed with Halfords plastic primer, were given a coat of the dark brown. Then, udders, hooves, noses, eyes and ears were picked out using a lighter shade of brush-applied acrylic. Finally, an overall coat of a much redder brown was brushed thinly over them, using varying coats to produce minor variations.


He's now got to paint the rest of the other cows that he forgot to take home!

Stephen had also been busy on the signalling equipment, namely two 'proceed' posts with 1.8mm dia LED's on back panels and a similar LED in a box, on top of a pole. As all lights were now required to flash, he'd produced a basic circuit using a 555 ic chip. With the flasher operating at 9v and the sound unit for the bell at 5v max, the wiring had to be modified, but the three-pole rotary switches used, were perfect for the job. Positions for the poles were agreed and drilled, and the guard rail, which had been painted white was fitted. The box for the switches located by the lever frame had also been made from plasticard and incorporated a drop-down front cover that exposed a labelled track diagram.


Wednesday 9th January

Worklist:
Cows
Fencing
Figures

A chilly morning, but the workshop was warm and inviting. Stephen immediately unveiled a new supply of cows that his neighbour Ian had recently produced. The original 3D file had been lost, so another had to be sourced online - a better shape, but the effect of a static pose and no head-turn needed to be assessed 'en-herd'. The new cows, printed in a different, red material, had been given two coats of grey plastic primer.


The previous, white cows were slightly smaller, were walking, and were looking to one side. After experimentation, the new, slightly larger grey cows were pushed nearer the front, where their size was less evident.


Putting the tree in place confirmed the arrangement worked well.


We had also been undecided about colour, but seeing them in place prompted us to adopt an overall dark colour and brown was decided. Geoff also found a whitemetal cow kit and was able to assemble it with its head turned, increasing the variety of stances in the herd.


The fence extension along the front was next. Some tight-grained timber was found and Geoff cut this in the band saw to sizes replicating the adjacent plastic fencing. Stephen then 'planted' posts along the agreed line and started to apply railings using a selection of clips.


The two gaps in the fence were discussed at length - where do the paths go requiring the gaps? Why were there two so close? Were they both required - could we barricade one? Should there be gates? Scenarios were discussed and one that entailed a general use path to the workshop and an access to the agents house off the platform was readily adopted. So, gates will be installed, albeit with appropriate warning messages!

Geoff had also found a few human figures in the whitemetal box. However, it was soon discovered that each had either arms, heads or both missing. He decided to add the missing appendages and although the arm in the pocket looked fine, we didn't think the bank robbers head had any place on the layout. He'll no doubt become another onlooker next to the crane.


And here are the 8 cows being printed.


The cows are printed on their backs to minimise the additional framework that is required to support them as they 'grow'. This open-mesh is removed with a knife. The inside of the cows is automatically filled with a grid support to maintain the external shape. The whole process took 11 hours!

(Yes, the video date is wrong!)


Wednesday 2nd January 2019

Worklist:
Finish grassing the hillside.
Review layout generally.
Photograph then-and-now scenes.

After catching up with our Christmas and New Year experiences (over tea and Christmas cake!) we retired to the workshop. Geoff had put some more filler and a coat of paint on the edge of the hillside. After removing the sheep, he and Laurence then worked along the strip. Since the previous grassing session, Geoff had fitted an extra brass mesh panel in the machine, to increase the charging surface area. We had also been advised by an exhibitor not to apply the glue too thickly and shake the container well. The result was very pleasing.


A patchy/camouflage effect was tried over the existing grassland, which created a slightly mottled effect.


Once reasonably dry, the excess was collected using an adapted sink bottle trap with a J cloth over the intake. The up-draft also lifted some of the fibres more vertical.


We then took a good look over the layout discussing outstanding issues that we need to resolve e.g. minor repairs, gluing down a myriad of small detailing items, extra lengths of fencing etc. Geoff was keen to 'do something' with an area of ground beyond the coal yard, which he thought was currently too 'tidy'. Either the space should have something on it, or it should be made to look untidy. Stephen suggested that the embryonic preservation group were likely to have a lot of non-running stock that would be put on show. Some Jubilee track was dropped in place and a rummage through John's stock boxes elicited a rake of the tiny wagons that went through the old tunnel to the quarry. Two wagons were chosen, couplings were removed and the wagons added. Maybe some tarpaulins or some signage? Watch that space...


Geoff had been busy with a new loco - a 3D printed 'Protected Simplex' bought from the Shapeways website. All of the internal details had to be scratchbuilt. Some of the bodywork surfaces were heavily lined and took far too much work to smooth, but once prepared, painting and weathering was started.The unit has been mounted on a scratchbuilt chassis incorporating a Tenshodo Spud mechanism.  Lots still to do, but it's looking good.


Finally, a photo session took place to create some then-and-now comparison photos to go with an article on the layouts development. With so much stock about, we couldn't resist having a running session, which was much appreciated.