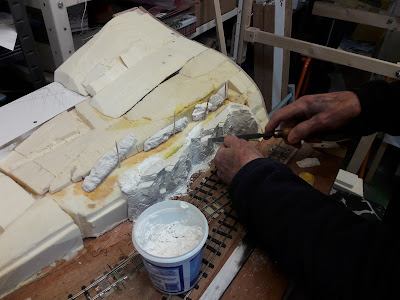
Wednesday 26th January 2022

Worklist:
Rocks.
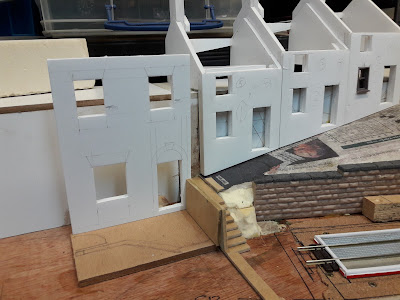
Managers house/office.
Windows.
Yard underlay.

Geoff & Stephen today.

Geoff had been working on the rock face and surrounds in the week and now carried on carving and filling. Later, he tidied up the sleepers in the area and gave them an undercoat of dark paint. 


Stephen had re-made the front of the managers office (official name now) a bit taller, which looked much better. He then spent ages trying to work out how to resolve the area in front of the office, the junction of the cottage path and the alleyway, and how pedestrians got down to yard level. A small section of wall was created, which resolved the height difference between the areas, then a landing and a flight of steps resolved the other two issues. A walled area with a gate outside the office has been sketched and we'll see how that develops.


Where and how people negotiate the yard once down at ground level has been a bit ad hoc. Geoff is adamant that people would not have been stopped from wandering through the yard, but equally, a safe/official route made more sense. A legitimate path was now traced around the edge of the yard area avoiding the dangerous corner of the engine shed and out onto the road. It made sense and should provide a few more modelling features.

Geoff had modified the 3D printed cottage window design to reduce the size of some elements, which looked much better. There are separate pieces for the inner and outer sashes. He'd also made windows for the engine shed, which also looked great. 


Finally, the rail-height yard construction was discussed - again. Geoff was keen to keep the amount of plaster to a minimum, partly for weight, but mainly for concern about cracking. He proposed starting with a layer of foam, then some papier mache, finishing with a thin coat of plaster and /or scenic grit to achieve a compacted earth finish. A piece of the XPS block he'd purchased for buildings, was put through the band saw to produce 5mm sheets. A few pieces were glued down as a trial. It is nicely flexible, but very strong and went down extremely easily. 


Wednesday 19th January 2022

Worklist:
Continue rock face installation.
Review 3D printed cottage windows.
Review engine shed.
Start to cover foam areas with 'papier mache'.

The first job was to confirm that the lower level rockfaces had glued successfully. Extra filler was then applied all around the panels to blend them together and with the surrounding areas. Obvious repeated features in the panels were carved to disguise them. The thinner rock strips were then shaped and glued into place.


Geoff had 3D printed a few prototype sash windows for the cottages which looked fabulous. They comprised front and rear halves, with a thin cill on the outer unit. Modifications were discussed, which will be incorporated in due course. A door and upper floor casement window will also be produced.


Stephen had developed the engine shed further although it was still in two 'L' shaped halves to allow painting and for interior details to be added more easily. Geoff described the sort of items that would be found in the 'running' shed i.e. no major works, and the type lighting likely to be used (so lights could be installed).


Finally, Geoff was keen to get a layer of 'papier mache' over the foam, so a tray of diluted PVA glue was prepared and we all took turns to layer strips of newspaper over the surfaces. These can still be modified and carved if required, but it does allow the scene to be visualised better. The stone retaining wall panel was also glued in place, with the help of some metal blocks.


Wednesday 12th January 2022

Worklist:
Review latest building developments.
Corrugated iron machine.
Rocks.

With a welcome full house this week, the session started with Stephen setting up the cottages he'd been working on at home. The basic components were now assembled, with gable ends, roof supports, wall stiffeners, chimneys etc. There were still two sections, broken at the change of direction, so that the remaining detailed work would be easier. There was also a preliminary facade for the managers residence/office.


The top/end gable was able to be fully accommodated on the layout which made the 'footpath disappearing around the back corner' the feature we hoped for.


A lot of discussion centred on the managers building, seen below with the alleyway beside it on the adjacent board. Designed with the door on the left (see above), Stephen wanted to wall-off a small area/garden to visually separate it from the works site and allow stored stone goods to be stacked close-by. Geoff wasn't so keen at first, but finally agreed, subject to further investigation. The facade was also reversed as a trial (below), which also had merit.


Stephen had also started on an engine shed, to stimulate discussion. Needing to be as thin-walled as possible, he'd opted for a timber frame on a low brick wall, clad in corrugated iron. As all were happy with the idea, Geoff talked through various features usual with such buildings, which Stephen will take on board.


Talk of corrugated iron (CI) led to questions about how Geoff was getting on with the CI machine - nothing, it transpired, which was immediately rectified. The machine started as a free download from 3D model website 'Thingiverse'. Supposedly for 7mm, it was clear after printing it that it was more G than O. Geoff had created a new scale profile roller set that would also allow prototype 8ft sheets to be made. The original supporting frame was now a problem for the longer rollers, as they bowed under the pressure and resulted in no corrugations in the centre. He now added steel axles and made a brass frame. There were still teething problems with long strips, but single, standard sheets soon appeared.


Stephen had taken home the rubber mould for the rock face used on the bridge board. It made sense to continue onto the cottage board, but Geoff had no quick drying plaster, so experiments were undertaken using some one-coat plaster. For a long section of wall, the moulded units need to be 'played with' to disguise repeat features. Turning upside-down and breaking it up all work. Filling corners and joints with extra plaster and carving work too, which we'll have a go at when the glue has set. 


A very productive week/session.


Wednesday 5th January 2022

HAPPY NEW YEAR!

Worklist:
Discuss Stephens cottage alternatives.
Progress cottages.
Discuss other buildings.
XPS!

No meeting last week as Geoff was otherwise occupied. Lawrence was unable to make it again this week and Geoff had a mid-afternoon appointment, so a disrupted but still productive day.

Stephen had been having more thoughts about the cottage doors and had circulated some sketches to illustrate three options: Doors onto the rear path (could be viewed as front or rear doors) and two windows only options (assuming the front door was on the other side). After a discussion about the nature of the footpath, it was decided to proceed with the doors option.


Stephen had made some individual cottage fronts comprising two-layers of 5mm polyboard (overlapping for ease of joining). These included a panel of 'waste' material along the bottom, to allow the ground level to be scribed. The lower end of the footpath was feathered down to yard level and the first two fronts trimmed to suit. These will be covered with a smooth stone plastic sheet. Geoff suggested he made some 3D printed windows and doors, together with all of the rainwater fittings. Roof slates will be the laser-cut cardboard strips, as used for the main building in Worton Court station.

With the layout set in the 1960's, the cottages have always been seen as fully or partially derelict. Geoff's idea to disguise the board joint by creating an overgrown alley between the 're-purposed' managers residence and the bottom cottage was developed further. Due to a wooden fixing block, the managers building would have to be brought slightly forward, which helped disguise the board joint further. Foliage and debris could be used to disguise the joint further. 


The third cottage was added, extending the row in a straight line, then the next two were added at an angle; a single rather than the double angle previously mooted. It would be more prototypical and it just looked 'right'. 


We should be able to fit a full-depth gable wall on the end, allowing the path to wrap around to the street beyond.

The two industrial buildings in the stonemasons yard were also discussed in more detail. It was felt the workshop structure should be clad in the coursed stone (Slaters) and not corrugated iron. However, Geoff wasn't keen on the proposed roof. Stephen had roughly modelled a flat roof with a parapet to keep the overall height down and prevent the creation of acres of slate. A quick trial of a hipped slate roof was made. After discussing the modelling potential that a flat roof offered, with possible lantern lights, water tanks, pipework, drainage fittings, debris etc., Geoff slowly came around to it. Then later, while looking for something else, Geoff came across the photo below; a group of gable-ended masonry buildings with corrugated iron roofs. The extra features shown could well be an excellent mid-way design blending nicely into the adjacent, fully corrugated warehouse. Design still TBA!


XPS - Geoff had circulated a YouTube link to a WW2 diorama video. The French café was shown emerging from a block of XPS, which was wonderful to behold. Formerly known as Styrofoam (and bright blue), it appears now to be known as Ravatherm (dark grey) and is becoming very popular with 'crafters'. Geoff had sourced a large block (construction offcut?) and Stephen had sourced a sample pack of 6, 10 & 20mm sheet (used as underlay for electric heating). The idea was that the thin sheet could be overlaid on a cardboard shell. Geoff now decided to use his block to make the coping stones for the retaining wall. First hand sawing it to get a piece that fitted in the bandsaw and then cutting 3mm strips. After gluing in place with superglue, he used a selection of dentists and other tools to scribe and shape the copings. He was extremely pleased with the result, which opens a new range of techniques to be investigated. Hopefully, a painted version will appear soon.


The foam-based Café series of videos: https://www.youtube.com/watch?v=B7y0QMzAp5w

6, 10 & 20mm sample pack (eBay). The material is very light, but surprisingly strong.


CAD - Stephen has been distraught at the recent loss of his AutoCAD package following a computer failure. After looking at a few free alternatives, he discovered QCAD and, after a brief trial, purchased the Professional version at £30! As it was 'along-the-lines of AutoCAD', it was relatively easy to pick up the basics although copious practice sessions will be needed to get up to speed with it. This version opens and saves DWG files, which means access to old drawings is possible again (to large extent).