Wednesday 20th December 2023

Worklist:
Building sign - review artwork, create waterslide transfer and apply signage.
Review new porch parts and assemble.
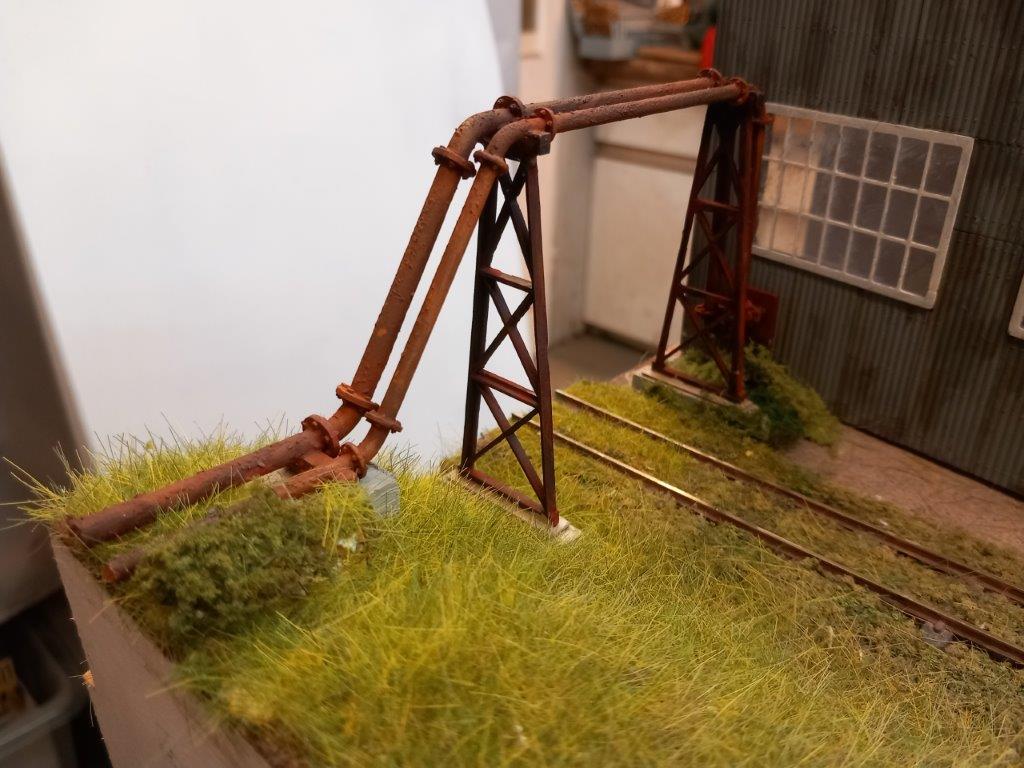
Finish pipework assembly and make good grass and foliage.
Fit engine shed windows.

Geoff had produced some artwork for the sign, which included some rust patches and a border. After printing onto waterslide transfer paper and trimming to size, the transfer was applied to the building. Microsol liquid was then applied all over the transfer to help bed it into the corrugations and over the bolt heads.


Note the bolt heads under the transfer.

Stephen had remade the porch components, but needed to check the width of the door cill. Once confirmed, the parts were assembled, ready for painting. It is still an option at this stage and will be reviewed again, as the area develops. 


The new paving in the area was discussed. One option was to lay stone slabs onto the existing 'gravel' surface, with a kerb along the front edge, providing a pedestrian area. The other option was to have paving flush with the road thereby suitable for mixed traffic, maybe stock for collection. The foam layer underneath would make the latter feasible.

Geoff finished painting and weathering the pipe framework. The concrete base was trimmed to size, then painted, and the area finished with electrostatic grass and foliage. More foliage could be trained up the pipes, which would be easier if the structure wasn't removable. It's present solidity makes the latter very likely.


Stephen fitted the engine shed window frames, which were generally a tight fit. The glazing will be added in due course.


Geoff had been researching a method of making trees from stranded wire, which gave a purpose for some very special cables. These lengths were rescued from the restoration project he's working on, and date back to 1938, when the carriages were first built. Lengths were wound together and trimmed to shape. 'Thick' PVA will be applied and dry tiling grout scattered over it to provide some texture.


View from the fiddleyard showing the three tracks. 

Left: The hidden track that runs under the buildings from the tunnel on the main station board. This is the Quarry line. Wagon loads of 'empties and fulls' (crushed stone and stone slabs), come and go on this line via the main station area.

Middle: The stonemasons private siding. The bulk stone materials come here from the quarry and the finished stonework goes on down the line for distribution.

Right: Is the 'mainline', to and from the main railway network.


Wednesday 13th December 2023

Worklist:
Review homework on the office/house.
Continue with pipework structure.
Print replacement windows for engine shed.
Degrade rust effects on engine shed roof.
Consider paving for office forecourt.

The guttering and downpipes built the previous week were lost in transit - twice!!! There was no choice but to remake them in the redesigned format. The back half of all the windows had been painted and fitted.


Stephen had always seen the office entrance with a porch to save staff waiting to be admitted getting wet in the rain. The first effort had oversized timbers and a tiled roof and it didn't look good. The tiles were cut off and a file was taken to the timbers, before painting. It was now a test structure, and didn't look too bad. The whole area had never looked resolved and now needed serious consideration. More anon.


Geoff made and fitted the timber panel at the pipe entry into the building. The pipe cradles were epoxied to the framework tops and the flanges were spaced-out and superglued in place.


After toning down the engine shed roof rust, Stephen returned to the office entrance and  made some trial stone slabs. Loosely laid, there was an immediate change in the area appearance. A Morris van was hastily retrieved from storage and placed to one side. It was looking good. Image searches for stone paving gave insight into how much texture was needed on thinner, coarse card. A panel right across to the loading dock would finish things nicely.


Geoff's trials with transfers onto the corrugated iron had worked well and after (finally) finding his sheets of home-transfer papers, it was decided to 'have a go'. The name, pulled from a list of common local surnames, random initials and an all-encompassing tag-line, will be applied to some transfer paper in due course.


It's all coming together nicely.


Wednesday 6th December 2023

Worklist:
Review Stephens homework on the office and house.
Progress pipework structure.
Fit angle brackets to hold the buildings down.

The primary homework was to weather the two buildings replicating Geoff's work on the workshop. With great trepidation, a slurry of plaster filler was applied to the buildings. Under the misapprehension that the wet slurry should be 'worked' into the painted, embossed plastic, this was started, but almost immediately some unexpected patches appeared. After letting the slurry dry a bit, the effect was better, so it was decided to let it dry-out completely. At this point, further rubbing down with paper towel evened the effect out, although the overall appearance had taken a beaten. However, the new 'down-at-heel' buildings might just suit the proposed location better, so the verdict was out for now.

Guttering and downpipes were made from umbrella struts and 2.5mm stripped power cable. All windows were initially painted white and the front doors green and brown, but the office windows and door frame were later painted green.


Dropped onto the layout, the 'shabby' appearance fitted well in their surroundings, and got the thumbs up.


Stephen turned to fixing the buildings over the 'tunnel' down using old aluminium brackets from one of Geoff's old LT projects. As per the cottages, the angles were fitted to the plywood base using 6mm bolts fed up into captive nuts from the tunnel ceiling below. With plastic sheet 'isolation' squares in place, epoxy glue was used to fix the buildings (and nut) to the angles.


Meanwhile, Geoff returned to the pipework structure at the board end. Brass and steel pipes were bent to the required shape. Brass cradles were made and the two pipes soldered to them. The printed flanges
had to be fitted prior to bending and therefore had to be moved around to avoid melting!


A third cradle was also soldered in place where the pipes come down onto what will become a concrete anchor base.


The wooden block was cut down and the void filled. 


A timber casing will be fabricated for where the pipes enter the building. A tree will be made and planted in front of the base, to a method Geoff had recently admired on YouTube. We await the outcome of that with interest.


An unusual view of the buildings from the fiddleyard end.


Extra windows needed to be printed for the house and office for Stephen to finish them off, but the part of the garage where the 3D printer resided was too cold, so the printer had to be brought into the 'warmer' room before it could be used. An interesting comparison of old and new technologies!


Stonemasons signage:  Geoff also ran a trial on applying waterslide transfers onto our corrugated iron sheets. A small proprietary transfer was applied and covered with Microsol. It appears to hug the contours well, but we'll see how it dries out next week.


Wednesday 29th November 2023


Worklist:
Fit pipe support bases with magnets.
Paint brick buildings with flecks.
Remake pipe support frame bases.

Geoff had glued rusty steel strips to the pipe support frame ends so that magnets in the bases would secure the frames, but also allow them to be easily removed. 2mm diameter cylinder magnets were epoxied into holes in the bases. However, on testing stability, the layer of rust separated from the steel plates and stayed glued on the frames. The issue would be looked at in due course. 


Geoff made-up a palette of suitable brick shades and daubed dots and flecks all over the brickwork. He had used this method on the workshop and it worked well (See later). Once dry, fresh repair filler will be rubbed over the surface to add the mortar joints, but at the same time, the brickwork colours are also 'merged' with the basecoat. 


Stephen had made up gutters and downpipes for the roofs, which were offered-up for a size and alignment check. The gutters will be joined into a single, central downpipe.

Stephen cleaned up the rusty steel base strips and made plasticard strips the same size, which were superglued together. Plasticard sections were also added to stiffen the plates.


Geoff bent two lengths of steel and brass rods to the required arrangements. One is designated for light sludge and the other a water supply. He cleaned-up some 3D printed pipe flanges printed last week and tested them on the two pipes. 


The pipes will be bent down to the 'concrete' base and run off to the flooded quarry. A new tree was discussed for in front of the base to obscure the future hole in the back scene.

A long time ago, when the stonemasons building was just an idea, Stephen went through a reconstituted stone manufacturers website and produced a selection of standard stone components as 3D drawing files. Some typical garden items and some gravestones were also produced. At this time, Geoff only had a filament 3D printer and the objects came out a little on the crude side, requiring a fair amount of fettling. Over lunch, the files were located and a set run-off on the latex printer, with a much improved surface finish. A trial packing case was also included, but although this didn't come out so cleanly, it should be possible to rectify the problem.


A better view of the foliage on the side of the derelict cottage, which hides the rear track to the fiddleyard. 


--------------------------------------------------------------------------------------------------------------------------

The workshop walls after filler-scrub treatment. The daubs on the new buildings are more in the red/orange range.


Wednesday 22nd November 2023

Worklist:
Apply base coat of paint on the brick buildings.
Check and review 3D printing of pipe flanges.
Continue forming weeds/shrubbery along alleyway.
Weather loading dock building.

The base brick colour was discussed and a single pot rather than a blend was chosen. Geoff then got to work.


Meanwhile, the 3D printed pipe flanges that were started earlier and had been unloaded and left to drain were reviewed. There are two sizes, and with bolts on both sides, vertical printing was required which meant that supports had to be added. 


After a wash in IP alcohol, the supports were removed and the flanges cured under the 'nail bar unit'.


Stephen continued with the alley shrubbery. Black plasticard strips were assembled and glued to the cottage to ensure the shrubbery could be removed with the cottages. The strands were twisted and prodded into a position to form a framework for the finer material.


The finer material was teased out and glued in place including a few dangly bits and some along the gutter. After rustification by Geoff, the corrugated barricade across the front was also glued to the cottage. We'll see if everything comes away cleanly once the glue has dried! It's hard to believe it's a board joint and that there's a railway line 20mm behind the corrugated iron.


The completed brick buildings dropped into place. It's a bold colour, but the next stage is to daub with spots of alternative colours (TBA), then coat with a plaster filler mixture for the mortar joints. The dried surface material will be rubbed off to (hopefully) achieve the same effect as the workshop on Worton Court. 


The assembled group, including the loading dock that Geoff had also weathered.


The signage is still temporary, awaiting more research and some decision making.

Wednesday 15th November 2023

Worklist:
Review latest work on cottages.
Develop pipe structure/bridge.
Develop rambling plant installation.

Stephen had painted the cottages and fitted gutters and downpipes. 


The derelict cottage had been given a blocked up window and broken window. We had originally planned for this to be fire-damaged, so the effects of such will be investigated.


Stephen had been researching names and signage possibilities for the factory, which had been bounced back and forth. Geoff had also been researching names specific to the locality at the time and had a list of possibilities. Stephen had made a simple paper mock-up that was taped onto the building, for discussion. Geoff was developing a backboard comprising horizontal planks. Investigations also showed that signage was often painted directly onto corrugated iron instead of a flat background, so Geoff will experiment to see if this was feasible on the model. The loading dock building is ready for Geoff's 'rustification'.


Geoff continued with the 'pipe bridge' albeit without the mid-span support structure, as the 8" pipes are now deemed capable of spanning the opening without additional support. Some 4mm steel rod was bent to shape (bends are required at both ends). The steelwork piers were deemed to be vulnerable to damage during storage/transportation, so, just in case, they will be removable. They had steel plates glued on the bottom, and magnets will be hidden in the concrete bases, making them removable. 


Stephen moved on the vine/climber that will disguise the gap in the buildings. Stranded wire was stripped and twisted into the stems and fixed to a strip of plasticard that was glued to the end cottage. The stems can then be run up/across the walls and foliage added to complete the feature. A piece of corrugated iron that blocks the alleyway will cover the lower part of the planting.


Wednesday 8th November 2023

Worklist:
Fit windows - office and factory.
Assemble the office building and front steps unit.
Review the existing end scene panel in the factory setting and consider proposal for disguising it.

The two brick buildings had been glued together the previous week and now Stephen glued the front steps unit in place. Geoff started gluing glazed window units into the separate factory building while Stephen glued the rest of the window frames into the house and office.


The existing white, 6mm MDF end panel was bolted in place to assess its suitability in the new factory scenario. The 'hole' was sized to suit its usual position just beyond the bridge which tended to obscure it to some extent. On the factory end, either something was needed to obscure the hole, a smaller hole, or a combination of both would be better as it the hole was more visible. 


An old idea for a framework supporting pipes over the track to and from the factory sounded good. Geoff found some plastic OO steel trestle frames that could be used and Google images were reviewed to find suitable prototypes. Geoff started to thin-down the chunky framework sections making them look more lightweight. Stephen prepared a black card insert with a minimum square sized hole. It was finally decided to continue with the pipe carrying structure and make a new end panel with a minimum sized square hole.


Holes for bolts to fix the separate factory unit were drilled. Fixings for the rear factory unit were investigated and two wooden blocks would be glued to the rear panels allowing bolts to go up from the tunnel roof.

The rear roof on the loading bay building was remade as the corrugated plastic had slowly deformed.