Wednesday 27th September 2023

Worklist:
Continue painting engine shed.
Glue ridge tiles in place.

Bowls and museum events had prevented a meeting the previous week. 

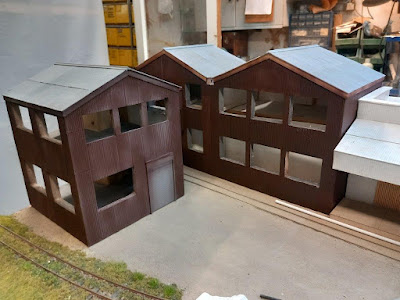
Geoff's rusty shed got the thumbs-up, so he added the 'dust' paint coat to tone it down. He then moved on to the roof, looking through the sample ridge sheets that Stephen had produced an age ago...


Stephen painted the exterior of the tunnel structure to assess what was visible through the various windows. One or two rooms were visible, so research on wallpaper around in the 1950's would be undertaken. Meanwhile, he got on with gluing the 'barley twist' ridge tiles to the cottage roofs and the fancier tiles to the house and office.


We were a dozen or so short of the barley twists, so Geoff printed another set. Only after drying and offering them up to the UV nail curer did we find a set that we'd produced in the previous session. Maybe this could become another source of wagon loads?


Just visible between the cottages and houses is a panel of corrugated iron preventing access along the alley beside the burnt-out cottage (the board joint). Stephen made a start on some climbing plants using stranded wire, spray painting the results and adding small clumps of foliage. It looked very promising.

The exterior of the buildings has yet to be determined although ideas have been bounced around. One or two of the cottages would definitely be whitewashed and the others left natural (warm grey stone is most likely).

Wednesday 13th September 2023

Worklist:
Tiling to the rear of the cottages.
Practice painting/weathering to engine shed.

Stephen continued tiling the rear slopes of the cottages. Once finished, a coat of dilute PVA was applied over all of the tiles to stabilise them.


Geoff had found an article on painting rust on rolling stock - fuel wagons in particular. The rear wall of the engine shed would be used for practice. After the dark rust base coat had been applied, lighter rust highlights were applied that were then dabbed with rubber solution. A grey topcoat was then applied over the whole area. Once dry, the surface was rubbed with a stiff brush to remove the rubber patches. The effect was similar to the wagons, but after reviewing various photographs of rusty corrugated iron cladding on buildings, a different appearance was noted. Different rusty paints were then applied by brush to achieve the vertical steaky rust effect. He'll wait and see how it looks after it has fully dried.

Wednesday 6th September 2023

Worklist:
Start painting the factory buildings.
Finish the roof tiling on the cottages.

Painting the factory buildings started with research - both of real buildings and advice from modelling sites. Geoff had determined that the most effective rusty corrugated iron models started with a dark, aged rust colour, then highlights of brighter rust and finally, with the un-rusted surface colours. Today, he mixed up paint to the dark rust colour and sprayed pretty much everything.


Stephen had been working on the interior of the separate building at home and had sprayed part of the interior with grey primer. A lot had ended up on the window reveals, which reduced the stark appearance of the white foamboard, so Geoff hand painted the reveals of the main building to match. Once dirty glazing has been fitted, not much of the interior will be clearly visible.


Stephen had also made the three remaining doorways from plasticard and these were sprayed with Crystal acrylic 'Periscope green'. (Tank periscope glass rather than submarines!) 


As there was brown paint left over, the engine shed got the same treatment.


Stephen had also discovered a wide-angle setting on his camera phone and experimented a bit.


Meanwhile, Stephen finished off tiling the rear of the cottages. These had been left as plain card slopes until the line of the backscene, the height of the ridges, and whether the rear roof slopes were visible had been determined. Still lots to be done on the cottages, but an interesting perspective.