Thursday 18th December

Worklist:
Continue with ballasting on the yard board.
Continue with refuelling area (coal staithe & water tower)

Laurence was away for a break in Dorset, but Geoff and Stephen pressed on with what they started the previous week.

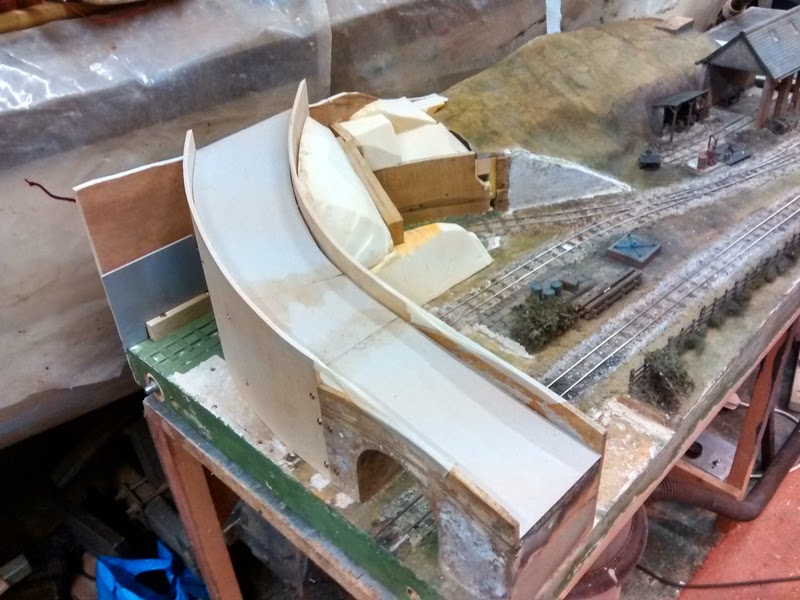
Geoff trimmed the front, plywood fascia to the previously agreed line, and also cleaned up the fascia where the road dips down. Profiling the edge on the yard as it abuts the road led to discussions on buffer options, which turned into making the buffers. Baulks of timber representing sleepers were built up, reinforced with vertical rail reinforcement and plastic sheet & bolt details. Very nice!


Stephen had researched and made a provisional coal staithe to 'size-up' the feature. The timber legs pushed down into the foam 'ground' and looked good. The water tower base was formed from plywood and capped the sloping ground line. John's original gulley grating was found in the 'bits box' and recessed into the bottom level.


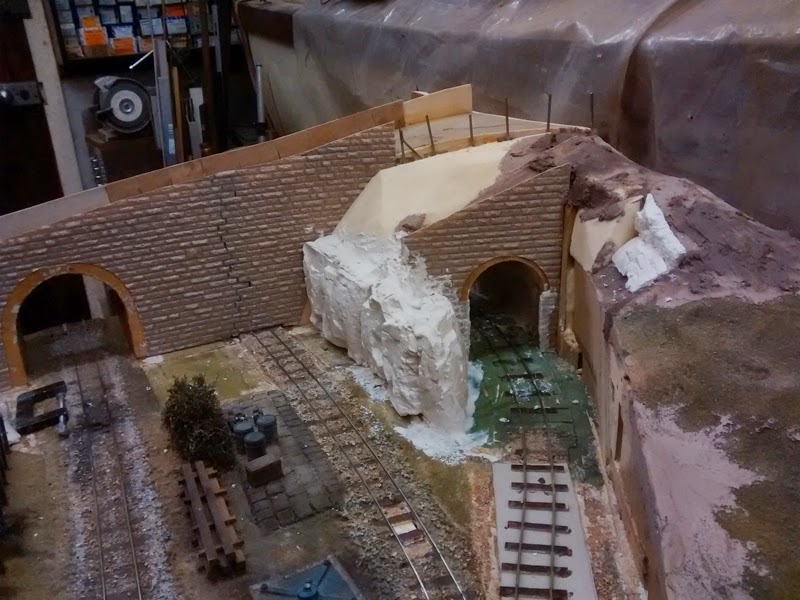
With the fascia trimmed to shape, the foam 'ground' was glued in place. The curving track from the station to the head shunt and the small, sloping area of ground is just gorgeous!


The large piece of printed circuit board on the joint next to the coal staithe had always annoyed Geoff, and he decided to do something about it. A router bit in the Dremel allowed him to cut out individual sleepers and then ballast the holes.


As a final exercise, Stephen reviewed the goods shed. We call it this, but it is a rather unusual structure that was probably just a simple transfer area for 'something'. Stephen prepared a piece of faced chipboard to see if a traditional area of staging looked any better, and it was a resounding yes. The space was measured and features / construction discussed, for him to make something up. It was agreed that the back of the cladding would have to be enclosed down to the staging, which should make it a much more traditional structure.


It's Christmas and New Years day on the next two weeks, so we'll have to decide when we meet next....

Thursday 11th December

Worklist:
Platform surfacing.
Fuelling station.
Board edging.
Yard development.
Water tank adaptation.

Geoff experimented with some proprietary ash ballast, to give the platform some texture. Strictly speaking, the test was on the adhesive base for the ash. Three 'glues' were tested - 3M Sprayfix, PVA and matt varnish. A layer of matt varnish (slightly thinned) was applied to the plaster fill, to seal the surface, but the jury is out on the glue, until next week.

Stephen was keen to review the yard area, following discussions on the extent and type of roadway that might be employed. The part-finished store was positioned to define the spaces in question. Geoff & Stephen quickly determined that an extension to the adjacent slope could run-up close to the store, leaving a space for a lean-to storage area. Some foam was cut roughly to size, which has a splayed end, and fitted the bill nicely.


The discussion then took an interesting detour, when Stephen related his re-viewing photos of the original layout and recalled the water tower that stood at the end of the platform. The tower was found and positioned, and thoughts turned to a refuelling station (coal & water). Various locations were discussed - primarily, both ends of the platform and the head shunt. It was finally agreed to place the coal stage on a raised platform where the tank had originally stood (first photo below), with the tank moved closer to the end of the platform. This location was sloping ground, which could be made level, but keeping the small mound and forming a solid base on top seemed a better idea; the coal stage could be a raised timber affair with the slope extended underneath.


The features were roughly located and the clearances tested.


The two boards had differing back edges that we had known needed to be resolved. The new fuel station provided the perfect solution, by cutting away the rather dilapidated edge on the existing board and replacing with a continuous solid timber front piece.


Stephen took on the edging and Laurence was deployed on water-tower adaptation duties.


The small mound now extends right across the board joint and runs into the upstand Geoff had formed a year ago - 'just in case'!


The resulting ground line is extremely pleasing, and blends with the curve of the track perfectly.


Thursday 4th December

Worklist:
Finish off platform.
Finish off plaster cast rocks and tunnel linings.
Continue ballasting.

Laurence was on a half day and joined us at lunchtime.

Geoff sanded down the platform plaster infill. Stephen thought it looked good, as the overall finish was smooth, with a few blemishes, but Geoff thought some sort of coarser texture was required. A dusting of plaster over a paint layer will be attempted next week.


The joints of the edging stones had been filled as well, but a fine scribing with a knife should put just the right amount of definition back.

Stephen worked on the rock sections fixed the previous week, and specifically on the mass of plaster poured in between the sections. Using a narrow chisel, matching rock faces were carved into the smooth-ish infill lumps.


He then turned his new skill to the lining of the tunnel which was placed/smeared by hand, producing a much more acceptable appearance.

Both then switched to ballasting - Stephen on the mine line and siding and Geoff on the extension board. Some thought needs to be given to the large yard area as a variety of surfaces is possible, which will have completely different visual effect and require equally different technique.


Thursday 27th November

Worklist:
Point repair
Ballasting
Rock faces
Platform surfacing

No Laurence this week, but work continued at a pace regardless.

Geoff set-to sorting out a point that had a reduced throw following his ballasting session. After extensive investigations above-ground, the point motor was taken off to discover a stray piece of chipboard causing the problem! However, poking around had messed up the ballast, and careful re-application of individual chippings was required!


 Meanwhile, Stephen was wrestling with the tunnel mouth. He fettled two of the plaster rock pieces to form the main outer/lower wall of the siding. A new piece for the mine line was added, each held with PVA glue first, then, when all pieces were in place, more plaster was poured into all of the gaps.


Two smaller pieces were fitted to a recess on the back-scene and, no doubt, a few more will be applied to the hillock over the tunnel. These areas will eventually be covered with grass, shrubs and trailing plants.


Geoff then tackled the platform surface. This had been discussed on several occasions, but with no firm idea emerging. With lots of plaster flying about, it made sense to give it a try. A batch was made with brown paint added (to avoid white chips grinning through in future), poured onto a primer of PVA and spread with a straight-edge.


The excess will be sanded down once completely dry, but even as laid, the effect was very pleasing.

Meanwhile, Stephen was tackling the inside of the tunnel. He'd planned to prepare a plaster layer poured onto a crumpled tin-foil sheet and press it onto the outer wall. However, realising the void was quite large, he started off by laying a wall of plaster by spatula and fingers. This soon took on a roughness not un-rock-like. Geoff likened it to sprayed concrete (so clearly unimpressed), but we'll see what it looks like next week.


The bent plastic rock sheets cracked as they were glued and had to be touched up with plaster. A lot of cleaning up of stray plaster required next week!


Thursday 20th November

Worklist:
Continue with timber retaining wall.
Continue with bridge and tunnel walling.
Start ballasting.
Fit the tunnel magnet.
Amend the wiring at the end of the line.

Laurence prepared the rest of the timber sections of the retaining wall, cutting to length and staining to match the existing. Gluing them in place and applying the steelwork won't progress until the tunnel mouth decoration has been completed.

Stephen moved the bridge and tunnel mouth stone sheeting along (a bit):-

Bridge - the extent of the facing stonework surrounding the mouth was determined and the plastic sheet cut away. The material for the applied facings was discussed and layers of thin card agreed. A template was made and Stephen decided to work on this at home. The top edge was roughly shaped to the top of the wall line and a small section 'invisibly' added at the highest point. It will be cut down to suit the final wall line in due course.


Tunnel - the area for the arch was cut away. The vertical 'quoins' were formed by cutting and bending the remaining sheet (with difficulty) so that it formed the lining into the opening. It looks OK at present, but gluing it securely in place is another thing. The arch will also be scribed thin card.


Geoff had a go at ballasting, using 4mm scale chippings. The original Cottesmore ballast was industrial cat-litter (for oil spills), which John used to supply from work. It comprised a mixture of sizes, which the 'mainline' ballast doesn't have. We'll review the completed section in due course and see if it can be 'softened' a little. It looks good though!


Stephen was keen to have a lighting feature down the mine tunnel and had been searching for tiny LED's. 1.8mm and 2mm units were found at approx. £2 each. However, Christine, his wife, came up with a surprise - a Wilkinson mouldable LED pack that she was using for free-standing Christmas decorations - £3.50 including the 2 AA batteries required. The loose wires between the surface-mount LED's were twisted together and the moulded plastic surrounding each LED was disguised with matt black paint. At a scale 14' between lamps, they will need to be adjusted, but the effect was perfect!


The final embellishment for the day was when Geoff cast a couple of units from a proprietary rock mould used on a school project. It comprised one large and one long-thin strip, both of which will be used on the tunnel area - superb.


Whilst the board was vertical, two outstanding items were attended to. The magnet on the mine line was made up and fitted in place. The original Cottesmore wiring scheme required the last 6" of track to be separated from the main board sections. This allowed them to feed the adjacent board, as described elsewhere. These feeds were repeated to feed the fiddleyard, but it confused operations. A few snips and resolderings joined the ends to the sections on the main layout and moved the end sections into the fiddle yard.


The editor has been chastised for implying that the gluing of the platform edgings was a little late. Delving through the archives, it was noted that the edgings were manufactured in January 2014. First post on the blog!


Wednesday 12th November

Worklist:
Bridge - parapet walls, facing stonework.
Tunnel - retaining wall timbers, facing stonework.
Platform edging.

A two-pronged attack on the bridge:-

When fitting the road surface, the natural contours of the block supports was followed, to take advantage of the undulations. However, we agreed that the parapet height, should be constant off the road surface, so Geoff produced small sections of card and MDF to the agreed height and glued them in place. As well as fixing the height, the additions will increase the core-thickness of the wall to give an overall, finished thickness of just over 18", once the plastic stonework is applied.


We also decided that the coping will be a bull-nose section, flush with the faces of the wall (i.e. no overhang). A suitable section will be sought/manufactured - probably in timber, or MDF.


Stephen applied himself to the stone face sheets and was pleasantly surprised to find that the pattern repeated itself. After some judicious cutting-out, a backing strip of plasticard allowed two sheets to be joined and cut to shape. Discussions took place on the design of the arch edging stones. A Google image search provided excellent prototypes and a clean stone edge with wall stones trimmed to suit was agreed. (Watch for developments).


The tunnel mouth stone sheet was cut to shape. However, the narrow piers either side of the opening didn't lend themselves to the same treatment, but a similar arch sitting on plain stone jambs was a perfect alternative.


Laurence took another batch of 'sleepers' and progressed the tunnel mouth retaining wall. Before he started, Geoff got the belt sander out and flushed-up the montage of timber base-work. An interesting effect was achieved, soon to be covered up.


Laurence also returned to the platform (not before time!) and glued the edging stones into place. We were all surprised how it brought the platform to life.


The centre will have a skim of filler applied and (possibly) a sand finish.


Unfortunately, Blogger 'Lightbox' has ceased to display the images in the usual manner. We think it's a system fault, but we'll keep looking for a solution.


Wednesday 5th November

Worklist:
Develop tunnel mouth.
Develop retaining wall.
Develop roadway and side wall/fence.
Glue the cardboard road down.
Develop bridge cladding.
Repair tunnel track and install magnet.

A congested three weeks that saw us miss one and shift the following two meetings to Wednesdays. We're also trialling an early start to allow S&L to beat the homeward traffic better.

On arrival, Geoff announced that he'd found a problem with the first section of track going into the tunnel - a 'ski-slope' of a joint. The obvious answer was to cut it out and form it correctly. As he started, it dawned on us that it was also the section we were planning to add another magnet to allow shunting allied to the mine siding. Doing it with the track removed was infinitely easier than with it in place, so a 'stroke of luck'. The magnet hole was marked out and corner pilot holes drilled. Two small holes marking the centreline of the track were also drilled, to assist locating the magnet from underneath.


Geoff used his oscillating saw to cut the hole, then continued to form the new section of track.


The remnants of the old tunnel mouth retaining wall can be seen above (Pyruma facing removed), beside the new retaining wall base. We hadn't given the old wall much thought, assuming it would be reinstated with DAS stonework or similar. However, Stephen had prepared a sample of the timber sleeper wall we were considering and we immediately decided to extend it right down to ground level. This required the old ply base to be removed and a new base installed, continuing the new section. A bit of wall reshaping was also possible to ease a tight spot.


The new timber wall (temporarily on masking tape) was offered into place. Plastic RSJ beam section and some 'chunky' bolt head details were purchased at ExpoNG at Swanley the previous week. These will represent 'ground anchor spreader beams' across the front of the sleepers. The sleepers are 5mm balsawood, in 12 ft lengths, stained Peruvian Mahogany.


In the photos above and below can be seen the results three other tasks. The roadway side wall has been cut away on the inside. This lessens the bulk of the bridge stonework and adds a bit of interest. The outside wall will change from bridge stone to dry stone wall. We pressed Laurence into action, making the rail fence posts. The tunnel mouth parapet has been increased in height. We're not sure of the final arrangement of the rocks/ground over the tunnel, but this seemed like a good idea. 


Also at Swanley, we spotted some Slaters 7mm stone walling very effectively used on a large industrial layout, and purchased some. Our final task was to offer this up and work out how to form the bridge mouth edging and join the next sheet. We decided to cut whole stones away around the opening and infill with DAS scribed accordingly. This can extend into the opening. Some plastic brickwork sheet will line the inside of the bridge.


We've not used this sheet before, and aren't sure how to join two sheets. However, it is coursed, so we marked out whole stones along the edge, and will cut the part-stones out. We hope that doing the same on the next sheet, will allow us to use DAS to infill between the two.


Stephen glued the cardboard road bed down and in-filled the gaps in the parapet walls. John had used liberal amounts of Pyruma on the bridge walls, but the plywood alone now look a bit thin. If they are covered with 'plastic stonework, they might need thickening with an overlay, beforehand. However, a DAS wall finish might achieve the desired thickness. We'll have to see....

As usual, we spent a little while taking in what we'd achieved. It's always a pleasant relief when we realise that the layout has moved along and still remains a believable entity!


Thursday 23rd October

Worklist:
Develop the scenery around the mine entrance, including the bridge and roadway.

In Laurence's absence, Geoff and Stephen made a right mess of the workshop, but it was great fun.

Backboard - the first job was to cut the backboard down to reflect the future ground and road outline.

Archway - the card tunnel mouth was twice-transferred to an offcut of 9mm MDF and then both cut out, glued together and held with clips to set. The end next to the siding was later cut back to allow the 'rocks' to get past.


Bridge & roadway - thick modelling card was chosen for the road bed. The side walls were marked 'brass-rubbing' style onto newspaper (all we had to hand). These were taped to thick grey card and cut out using the band-saw!


The top of the road posed an interesting problem. As previously alluded to, the cut through the road at an acute angle generates a steep cross fall which just doesn't look right, so wedges were cut to level the road up to make it look right (we hope). The card was glued together (not to the subframe yet) and left to dry.


We had a straight piece of ply already cut out for the extension of the tunnel entrance back wall, but it was too close for a decent clearance 'post-facing material application'. A few cuts in the back generated a nice curve and it was glued into place. The old plaster 'stonework' was taken off (only held in place by the paint) and we spent quite a while discussing ideas for the retaining wall face treatment. We're now favouring a sleeper wall with bullhead rail spreaders, held back with ground anchors and big nuts. ExpoNG at Swanley is imminent, so some detailing parts will be sought.


We then turned our attention to the rock faces. The newspaper balls were discarded in favour of foam blocks. Geoff had rescued (with permission) a few pieces of insulation board from a local skip. He then spent quite a while on the band-saw, carving and shaping pieces to form a base for a Modroc overlay.


At the same time, Stephen worked on a piece of thin ply, adjusting it to fit into the back of the tunnel and hide the main structure. It won't be visible from most angles, especially after it's painted black/grey.


We decided that the bridge side walls would stop once securely based on the rock substrate. The wall on the outside of the curve can be continued as a dry stone wall and provide a backdrop. As highlighted earlier, the inner wall just goes up too high, so the red area will be removed in due course, and a fence fitted instead (see previous week sketch). 


We were covered in sawdust, foam dust and there were slivers of ply and foam everywhere, but we felt we'd moved things along in the right direction. Meeting will be patchy for a few weeks, but we'll have plenty to think about.