Thursday 28th May

Worklist:
Start making the point actuators
Generator building
Engine flywheel
Estate building and adjacent scenery
Tank base

As planned, we made a start on the base plates for the point actuators. Stephen had supplied an aluminium fascia sample panel that had a bent edge, perfect for the bases and Laurence started to cut them out.


9 are required, so 5 to go.


Stephen finalised positioning the Gasifier support framework. This can now be fixed in place and the floor completed. The Engine room raised floor was cut out and positioned. This will be held in place with tee nuts to allow the engine and drive mechanism to be assembled off the model. Geoff plans to have a chess-board, black and white floor tile floor. Routes for lighting cables were also planned and the required holes marked.


Geoff machined the second flywheel and finished the spokes by hand. He also made a start on the crank/drive shaft.


A long discussion took place on how to shape the foam block abutting the garage/store building. A separate retaining wall was agreed. Which was cut out and finished in plastic brickwork by S & G jointly. Stephen then shaped the foam roughly, gluing additional pieces as required.


Stephen was keen to reuse a proprietary vacuum formed van body that John had converted into a shed. A new fence will enclose the shed and screen it from the adjacent road passing through a gateway, onto the estate. However, only when preparing the photo below did a glaring error show up. The hole in the wall over the shed is the doorway to the first floor, which is reach via a solid staircase. A rethink required!


 Geoff moved on to finishing off the gas plant water tank base, cutting off a slice and gluing a panel of brickwork.


Thursday 21st May

Worklist:
Gas holder brickwork
Extension board scenery
Gasifier room equipment
Generator room equipment
Engine flywheels

Geoff & Laurence continued the gas holder brickwork, which received a dusting of talcum powder and some Pounce - a degreasing powder used by draughtsmen (Stephen showing his age and hoarding problem). The pounce was a slightly better colour, but didn't stay in the joints as well as the talc. Geoff gave it a light, spray coating of thinned matt varnish. It's a bit patchy, but the effect is there, which weathering will improve.


The extension board was brought out for its first airing for several weeks and Laurence started the application of papermache to the exposed foam slopes.


Stephen trimmed the scrubber pipe to allow the gasifier to be moved closer, and hence, make the generator room a little larger. A small sleeve was made to join the two pipes together. The fanlight in the end wall was amended to allow the building to be removed whilst leaving all of the equipment on the baseboard. The gasifier framework can now be glued down and the internal floor finished.


A layout dry run - Gasifier plant, engine base and motor, with the sketch layout. The motor (black unit above the engine), was sourced from a large box of motors, and was selected for its quiet running and integral gearbox. It will be housed in a hole in the floor behind the engine and, with a small rubber wheel, will drive the inner flywheel.


Geoff continued making the two flywheels, by milling out the metal around the spokes.


One of the spokes has been 'rounded' using a hand-held Dremmel with a grinding burr. Very nice.


Discussion on future work:

With 9 point actuators to make, it was decided to make a start. The prototype unit was offered into place and noted that 2-3mm could be trimmed off to keep the aluminium frame/plate within the depth of the baseboard. Stephen to provide a sheet of templates and some aluminium plate for next week.

The old stable building on the extension has been covered in brick paper. Although very nice, the rest of the layout is clad in embossed plastic. At the Epsom show, Geoff purchased a sheet of English garden wall bond plastic, which will be ideal for the estate wall. This makes it even more likely that the stable will be over clad in plastic, especially as the shallow arches can be made in plastic too.

Thursday 14th May

Worklist:
Gas holder walls
Generator room repairs
Generator engine flywheels

Unexpectedly, we had a full house this week. The major plumbing work, originally planned for Laurence, may not needed after-all. Fingers crossed. That said, he was put to work immediately, painting the coping bricks around the gas holder retaining walls.

As an engineer of high repute, the masking tape had to be applied correctly!


The mortar joint paint on the curved coping bricks failed again, so Geoff resorted to talcum powder, which has worked - so far. Keeping it IN the joints will be the next job. Some spray fixative/sealer sounds right, but what in particular?


The world of brick detailing and 'brick specials' for this area has been an interesting and, hopefully educating process, but we've also had a lot of fun with it.

Stephen made the final adjustments to the repaired plasticard brickwork and cleaned up all the edges, then, as Laurence had the tin open, it was given a coat of paint. Blending/weathering the repaired, old and new extension brickwork will be an interesting exercise.


The equipment in the gasifier end of the building needs to be modified to get it as close as possible to the end wall, to create as much room in the new generator room as possible. To do this, the connecting pipe to the external equipment will be shortened and the gap removed. The gap currently allows the fanlight framework to drop between the duct elements. The fanlight will need adapting or removing. 


The highlight of the session was Geoff making a start on the generator engine flywheels. First drilling the main holes between the spokes using the rotating base on the milling machine, then shaping and parting in the lathe. A lot of careful filing will be required, but it's an inspiring start.


Thursday 7th May

Worklist:
Gas holder walls
Generator extension

Just two again, as Laurence is busy preparing for some plumbing work.

Geoff started to apply the light paint to the coping brickwork painted the previous week, but discovered that wiping the new paint into the joints caused the base paint to lift off - incompatible materials blamed. It was also noted that the joints were not pronounced enough to take the paint anyway. The grey paint was removed completely, the joints re-scribed and repainted.


The coping brickwork to the footpath dwarf wall was made and fitted in place.


Stephen cut away the projecting arch brickwork on the main building, allowing the extension to sit flat on the front. The extension was temporarily attached with a screw 'through the round window'. The roadway was cut away to accommodate the extension. This allowed the doors and frames to be trimmed and packed to the correct height.


The main building plinth brickwork was progressed and the window cill bricks added.


Thursday 30th April

Worklist:

Gas holder:
  • Retaining wall
  • Steel framework
Generator room
  • Extension building
  • Main building plinth
  • Engine
A full house this week and a fair bit of job sharing.

Geoff worked on the holder framework base plates, preparing holes in the plastic pads/sub-base, and bolting them together. The concrete pads and sub-base were given a coat of 25yo Humbrol paint that had developed a suitable grittiness. Thin plastic plates, with rivet detail, have been fitted to the steel ring/upstand, which will be painted, in due course.


Laurence then carved the excess plaster 'ground' behind the retaining wall and painted it dark brown and the coping brickwork dark grey. The light coloured 'mortar' will be applied when everything had been finished and cleaned. Just the brick coping to the low-level wall along the footpath, the footpath itself and the handrails are outstanding.


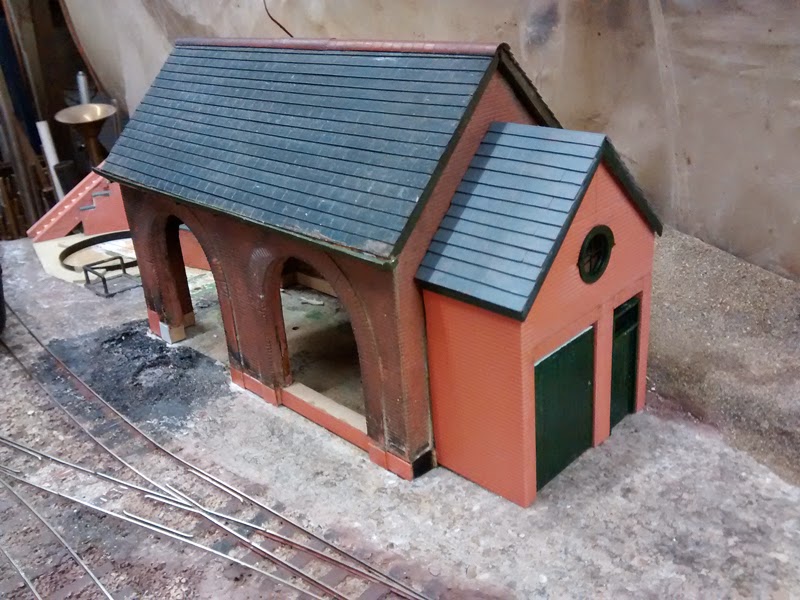
Meanwhile, Stephen painted the generator room extension doors, window, and fascia dark green (to match the future 'great window'.


Laurence painted the roof. Inadvertently, it turned out to be a shade lighter than the existing roof, but this only reinforced the fact that it is a later addition, just like the brickwork, which will receive only nominal weathering.


Stephen started a job he'd been reluctant to tackle - remedial work to the generator room low-level brickwork and development of the new plinth brickwork. This required cutting away old plastic brick sections and rotten plywood, and filing the applied pieces of MDF to accommodate replacement brick sheeting. It had been decided that the new plinth should be proud of the existing wall, so there were several layers to be taken into account, as well as the brick coursing/bond. Brick sheet pieces were applied to make-good and form the plinth. A fiddly job, but it soon developed into an interesting exercise. At 'close of play', it looked like it was going in the right direction. However, matching the weathering on old and new brickwork was seen as a potential difficulty. The obvious answer was to paint the plinth dark grey, which was accepted as a realistic option.


After the gas holder, Geoff had moved on to the generator engine, which he had started a few weeks previously. A turned brass cylinder (horizontal) had been made and the engine body started. The latter needed to be shaped at the same time as being split, to enable the axle to be inserted. The parts then have to be incorporated into a plinth. The frame had been soldered to a steel base so the unit could be milled to shape. The unit was split and the axle hole(s) formed. Finally, the casing was shaped and assembled with the cylinder. A lot of work is still required to make the wheels and various fittings, motorise it etc., but it looks superb.


Not getting any younger, it's interesting to see how we address the situation.

 
Back and eyesight?

Eyesight and not enough chairs!


Laurence is reading a book by Gordon Gravett on scenery, which Geoff had bought at the recent Epsom & Ewell MRC show. It is a fabulous book full of tips and inspirational photos on grass, flowers/weeds, shrubs, puddles, mud, roads, etc. As with similar high-quality modelling, it can be daunting to see how far away most of us are in terms of quality, but they must be treated as inspiration, and this book will certainly be scrutinised for things we can use on the layout.