Showing posts with label Rocks. Show all posts

Wednesday 25th January 2023

Worklist:
Make axle converter shaft for Land Rover.
Make sub-roof panels for factories.
Tidy-up re-flocked siding.
Recreate area under lorry tipping point.

Stephen had been progressing his Land Rover shunting vehicle at home and now needed a favour. The Corgi car axles are 2mm dia. and the output shaft in the gearbox is 1/8". Geoff kindly offered to make a brass transition axle to accommodate both requirements.

Stephen then moved onto the factory roofs, cutting laminated grey card sheets to size. At the same time, checks were undertaken to ensure that all panels had right-angle leading edges to ensure that the corrugated cladding could be correctly applied. He then moved on to making the substructure for the loading bay roof. For this he used offcuts of some 2mm MDF strips that Geoff had thrown away. These came from packing case sides, which were soon found to be an excellent replacement for thick cardboard, as they were solid and flat, but easy to cut with a craft knife.


Geoff started with the shed siding, taking time to remove excess flock and plaster.


The water tank, swivelling engine feed pipe and underground tank feed pipe were discussed and confirmed again. Geoff moved on to the lorry tipping point on the quarry edge. He was keen to create a solid edge and was planning to use sleepers. Stephen suggested a rock face, using the same mould used for the engine siding area. The mould was partially filled with plaster and left to dry. After lunch, the old face was cut away and sections of the cast rock fettled and fitted into place. Additional wet plaster filled the gaps. Geoff is still concerned about how the rock angles can be accommodated with the surface debris to be re fitted to the perspex. He will try and reconcile this query next week.


Geoff also started to introduce troughs and dents in the adjacent road surface.


Wednesday 18th January 2023

Worklist:
Continue with scenery - grass and stones.
Continue with the factory building.
Investigate a Land Rover conversion.

The first job was to run a fine saw through the joint between the two boards. There was only a tiny bit of glue to be cut and both boards were free. 


Geoff then got to work extending the grass areas using electrostatic and hand applied grass. This time, fine brown grit was sprinkled over the glued areas (as seen on TV). We'll review the effect after the excess has been hoovered off next week.


He also added more stones to the dumping area.


Geoff's LWB Land Rover (Oxford) is slightly larger than Stephen's Corgi model, but it might work in our favour as the Oxford version does look big between the factory buildings.


The engine shed siding suddenly became overgrown with grass and weeds. Paraphrasing Geoff's own words "It'll be interesting to get the track usable again!"


Stephen was pleased with the solidity of the factory roof structure constructed from the previous week. He filled in the rear areas to provide support for the rear roof edges. He then checked and adjusted the alignment of valleys, ridges etc. to ensure that each roof plane was flat.


A roof gutters had been laminated from thin card and was now loosely fitted. A hopper and downpipe will go on the front, in due course.


Stephen's Land Rovers had arrived and he had stripped one to bare metal. He'd also cut-away areas of the body and the chassis to facilitate a motor and gearbox. 


He'd had a problem getting the Branchline's gearbox kit square. Geoff talked him through remedial work and how to make the final connection between motor drive and axle. Maybe a job for next week.


Wednesday 8th June 2022

Worklist:
Engine shed base.
Board #4  tunnel mouth and scenery base.
Yard area and road base.

Just S&G this week.

Stephen returned to the shed base and fitted 4 cocktail stick ends into the plaster to retain the engine shed. This will allow it to be dropped into place quickly until it is decided whether to fix it down with bolts or glue it.


Geoff decided to make the tunnel mouth. Some of the XPS foam (dark grey) was sliced up and the tunnel mouth stonework scribed into it. Another slice of foam was fashioned into an abutment wall.


Stephen moved on the the yard and access road areas. For the road surface, it is intended to use the chinchilla dust, which was successfully used on the station area roads/paths. This is a very fine grit/dust that will represent a crushed/waste stone finish. It needs to be carefully applied to get a smooth, even finish, so we will have to have some practice sessions before attempting the large yard area. The yard had been given a 3mm layer of the XPS foam. Plaster filler was applied to infill any gaps and create an even surface. This will require a further layer of plaster to bring it up the correct level for the dust finish. The roadway outside of the yard had been given a rough PVA and newspaper covering. A levelling coat of plaster was applied to allow lumps and ridges to be smoothed out.


Stephen then moved on to board #4 and applied a couple of layers of newspaper and PVA to finish the scenery shell.


This is the building from last week that had the front door and window reversed to make the chimney stack position credible. (Stephen couldn't decided how the chimney stack would be built beside the adjacent high gable wall. Surely, for good smoke dispersal, the pots would have to be on a level with next doors, which would look odd?).


Wednesday 2nd February 2022

Worklist:
Progress managers office building and local area.
Rocks - finish carving and paint. Also paint hillside base coat.
Finish laying foam underlay in yard area.
Prepare and fit front lipping to baseboard.
Prepare and glue foam sections behind lipping.

Geoff & Stephen

Stephen had reviewed the office building (again) and increased the overall height to make it more 'important'. He'd also increased the window heights similar to a building in the Welsh industrial workers housing book he'd been using for inspiration. Side/return walls had been added which created depth - it was now a building. The building was now tried in place and varying base height were tried. A piece of plywood was used to envisage the paved area leading to the front door. Once happy with the design, some steps were made to complete the area. A wall or fence will separate the area from the adjacent workers footpath.


The Bridge board was fitted on the end to confirm that the mating of the two profiles was ok. Geoff did a little more carving of the rockface before giving it a coat of paint.


The hillside was then given a coat of brown paint. It took some time to remember what paint we'd used previously for both areas, but we got there in the end.


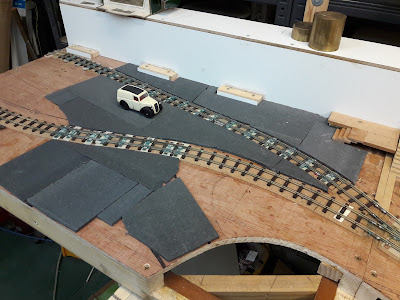
Stephen finished laying the foam underlay in the yard area. He also put a ford van on the yard to assess how big the yard actually was.


The baseboards had been made narrower than needed to allow for land profiles to be added once we knew what we were making. The last job of the day was to source and prepare a length of MDF for the front lipping/profile strip. Once glued and clamped in place, foam offcuts were glued in place ready to be carved to shape in due course.


We keep saying it, but we are often amazed at how things just fall into place and this week was no exception. the boards looked like viable sections of railway, which was very pleasing.

Wednesday 12th January 2022

Worklist:
Review latest building developments.
Corrugated iron machine.
Rocks.

With a welcome full house this week, the session started with Stephen setting up the cottages he'd been working on at home. The basic components were now assembled, with gable ends, roof supports, wall stiffeners, chimneys etc. There were still two sections, broken at the change of direction, so that the remaining detailed work would be easier. There was also a preliminary facade for the managers residence/office.


The top/end gable was able to be fully accommodated on the layout which made the 'footpath disappearing around the back corner' the feature we hoped for.


A lot of discussion centred on the managers building, seen below with the alleyway beside it on the adjacent board. Designed with the door on the left (see above), Stephen wanted to wall-off a small area/garden to visually separate it from the works site and allow stored stone goods to be stacked close-by. Geoff wasn't so keen at first, but finally agreed, subject to further investigation. The facade was also reversed as a trial (below), which also had merit.


Stephen had also started on an engine shed, to stimulate discussion. Needing to be as thin-walled as possible, he'd opted for a timber frame on a low brick wall, clad in corrugated iron. As all were happy with the idea, Geoff talked through various features usual with such buildings, which Stephen will take on board.


Talk of corrugated iron (CI) led to questions about how Geoff was getting on with the CI machine - nothing, it transpired, which was immediately rectified. The machine started as a free download from 3D model website 'Thingiverse'. Supposedly for 7mm, it was clear after printing it that it was more G than O. Geoff had created a new scale profile roller set that would also allow prototype 8ft sheets to be made. The original supporting frame was now a problem for the longer rollers, as they bowed under the pressure and resulted in no corrugations in the centre. He now added steel axles and made a brass frame. There were still teething problems with long strips, but single, standard sheets soon appeared.


Stephen had taken home the rubber mould for the rock face used on the bridge board. It made sense to continue onto the cottage board, but Geoff had no quick drying plaster, so experiments were undertaken using some one-coat plaster. For a long section of wall, the moulded units need to be 'played with' to disguise repeat features. Turning upside-down and breaking it up all work. Filling corners and joints with extra plaster and carving work too, which we'll have a go at when the glue has set. 


A very productive week/session.