Wednesday 27th March 2024

Worklist:
Make and fit diagonal bracing for the new board legs.
Make and fit end panels for transporting new boards in one unit.
Fix faulty point outside engine shed.
Wire-up power supply for engine shed lights.


Having made the two leg frames for the new boards, it was decided that adding diagonal bracing would turn them into a rigid frame that was safer and more useful. Two lengths of timber were cut to length and bolts holes drilled at the ends. Self-tapping M6 sockets were fitted in pre-drilled holes in the uprights and the cross-braces fitted. However, these braces were fitted with one on each side, which did not provide the rigidity assumed. The last job of the day was to modify one of the braces so that they could be fitted beside each other, with a bolt in the centre, to make it rigid.


A fault had been noted in the operation of the point from the engine shed into the ash siding. The boards were clamped vertically on the frame for easy access to the underside.


After much investigation, Geoff determined the travel of the servo horn was excessive, causing 'bounce-back'. The only solution was to reprogram the point motor on the master servo control module. Instructions had to be re-read and the handheld programmer tracked down, but the issue was resolved, eventually. (Good practice for the exhibition!).


After unbolting and placing the two new boards on the floor, a compact and comfortable overlapping arrangement was established. 


The ends, bolt hole and pin positions were measured, before two pieces of MDF were cut to size and holes drilled. The ends were then bolted in place and a very neat transportable module was revealed.


Meanwhile, Stephen was able to wire-up the shed lights to the power supply unit installed many months previously, which provided a much better view of the interior.


The lamp shades were cut from a strip of pill holding plastic.


Wednesday 20th March 2024

Worklist:
Have a clear-up.
Set up the whole layout and check everything over.
Identify anything that needs repairing. (We started a list...)
Check the new control panel is working correctly.

The first job was to have a clear-up. Geoff's main workshop (next door) was being used for a large amount of woodwork, and sawdust had crept into the railway area. As much dust as possible was swept and hoovered away, including a fine dusting that lay over the layout itself, despite protection from several sheets.

The next job was setting-up the layout, making sure the trestles were in the right place and the positions recorded. We started at the window/station end, which rests on a purpose-made frame, that sits on the bench, and finished with the fiddleyard resting on the storage frame.

  
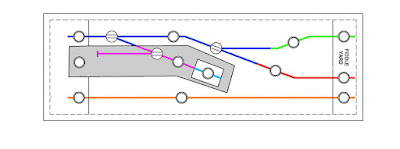
Stephen set about testing everything on the main station boards - track sections, points, lights etc. Only the goods shed lights had failed, which weren't critical. At the other end, Geoff bolted the new control panel in place and connected the loom. Testing with Stephen's loco running from the other end, only one of the three section switches was the wrong way around. However, it was quickly realised that the painted panels on the panel were not correct. The track in Edwards' yard (unpainted) is actually in the same controller selector as the engine shed, which initially seemed odd. However, after considering likely stock movements, it was decided that this was quite reasonable, so the grey area will be extended to make this clear. Essentially: one section for the mainline. One for the fiddleyard track and a central section for the engine shed and the stone masons yard, which runs onto the fiddleyard. Got that?


The handover areas between the new and old boards were rediscovered by trial and error. And, it seemed, there were more options than we remembered, which should provide many brain-stretching episodes when we run 'in earnest'.

We next located and put small blocks next to the magnet uncoupling positions, refining the positions with multiple test uncouplings. When satisfied, small marks were made on the road surface, which will be adapted to become oil stains or such, to aid operators. It was very satisfying to finally run stock over the new boards. The new boards are working out to be great additions to the layout.

Everything was packed away to avoid being drenched with sawdust, as Geoff had a lot more woodwork to finish that evening.


Geoff dropped into the conversation that the Salisbury show is 8 Wednesdays away - a sobering thought. Logistical planning is underway and accommodation was top of the list. Layout-wise, we still have to make end plates to bolt the two new boards together, for transporting. Geoff still thinks we can get everything into our 2 cars (emoji fingers-crossed!).


Wednesday 13th March 2024

Worklist:
Progress lighting system.

The new LED's had arrived and were tested. We only needed 2m lengths of warm and bright strips, but the bright light supplier provided 5m. Inadvertently, this allowed us to install two rows of bright white, which exactly copies the main layout lighting. 

The strips were tested and thankfully, the colours matched the existing LED's.


The separately purchased power extension leads were then fed down the support poles/tubes.


Self-adhesive silver tape was applied to the inside of the guttering.


And the LED's installed.


The lighting was consistent.


The number of power supplies has increased!


The control panel masked-off and the fiddleyard route was sprayed with yellow 'plastic' primer. It looks odd, so we might paint the 'mainline', to even it up. It does the job, and only operators will see it!


Wednesday 6th March 2024

Worklist:
Progress lighting gear.
Progress control panel.

Instead of the brass collars soldered to the lighting poles, Geoff had manufactured nylon block-clamps with a bolt fastener which facilitated an adjustable pole height.  Geoff had also manufactured fixing brackets for the gutters, which were now fitted to the pole ends. A new pole was setup alongside the existing pole on the bridge board, to get the line and level. The second pole was then levelled with the first pole and a nylon block fitted to fix the pole height. A length of 100mm black guttering was cut to length and screwed to the brackets and the brackets fitted on the end of the poles. 


It would be nice to say that everything fitted perfectly, but both brackets had to be refixed to get everything level. Cable holes at the ends of the poles were marked to suit the brackets and cut out. The poles were taken apart and sprayed with grey primer. Blank ends will be made for the gutters in due course. Power supply cables will be fed down the poles and once they arrive, LED strip lights will be fitted to the gutter interior, together with silver foil tape.


Existing and new lighting gutters: Although three were originally fitted, only 2 strips of LED's were powered on the first lighting strip, so only 2 will be fitted to the new light unit (1 x warm white + 1 x bright white).

Focus turned to the control panel. Much thought went into deciding how to indicate the area of track that each of the three controller section switches the 'master' switches covered. It was decided to spray paint the background of the central engine shed area with grey primer. This left the mainline and fiddleyard lines well defined. 

Before spraying, the switches were carefully masked with..... masking tape. Probably the first time in years it had been used for the purpose is was made!


A good coat of paint was applied, to be revealed next week.


Coloured vinyl strips will be applied to all track routes to identify the various sub-sections. It should look a bit like this:


In memory of Laurence Murray, founding member of the Cottesmore Group.

15/03/1931 - 5/03/2024