Thursday 21st April

Worklist:
Develop yard road surfaces
Finish vertical drill
Develop mine siding area

Following the previous weeks road plastering, Geoff had filled the areas around the timber infill with more Smooth-It. A light scrape and sand finished off the interfaces. The area between the main siding and the head shunt were now treated with PVA and more plaster. This area is intended to be a coaling stage/collection point, and the surface will be treated to represent compacted ash.


A coating of 'Yard Filth' was applied at one end, as a trial. Grubby brown in colour, the paint also has some texture material in it that created quite a nice effect.


Geoff went on the cut out and glue down section of paving setts for the main yard area. 


Gulleys and manholes will be fitted in due course, together with the other paving panels which we hope to pick up at the Epsom & Ewell show the following weekend.

Laurence fitted a dividing head plate he'd made for the vertical drill. He also cleaned up the electric motor and pulley assembly that sits over and drives the drill.


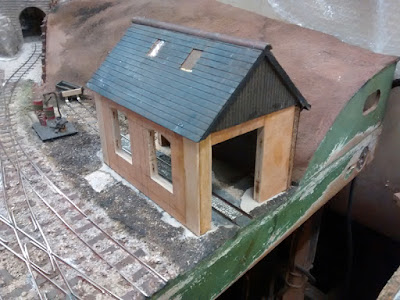
Stephen spent a while cleaning up the workshop walls, but turned his attention to the mine siding area. With several of the original features already removed, all that remained was a scribed plaster platform, a few oil drums, petrol cans, a packing case, a seated figure and some shrubbery. We discussed what the siding might be used for and whether the bits could fit into the scenario. We decided that the siding and platform would probably be to 'hold' goods transported here on normal trains, ready to be taken up the mine on company wagons. A covered store would be ideal, and an old van (possibly a Slaters kit) was found in the 'bits box'. A new platform of sleeper edging and ash infill seemed appropriate. Stephen got to work...

Just the old platform to be removed

New timber sleeper platform edging

The van being tested in place. The platform may require amendment


Thursday 14th April

Worklist:
Road construction
Workshop

No Laurence this week as he had a major financial transaction to complete.....

Stephen spent 20% of the time cleaning up the walls of the workshop and the rest of the time watching Geoff build a road along the newly completed wall.


The road would be our first use of Smooth-It - a form of fine plaster that is widely used in the construction of roads for 'controlled' vehicles, mainly in OO/HO, and made by Woodland Scenics.

Instead of the recommended foam strip, a thin timber 'kerb' was glued around the area of road to be formed. This contains the plaster and forms a guide for levelling. As an added process, PVA was spread on the card base.


The recommended mix is quite sloppy, but, as a trial, Geoff made the mix a bit thicker. The shape and angle of the first 'pour' meant that smoothing the surface using the kerbs wasn't easy, but an acceptable finish was achieved.


We were quite happy to see a few imperfections as it gives us the opportunity to try out a few techniques described in a book Geoff bought a while ago.


A much thinner mix was prepared for the main are where the kerbs could be used, and Geoff was much happier.


We have accumulated various sheets of embossed plastic setts and paving, and wanted to use them in the goods yard. Deciding which to use and how to lay it required considerable thought about the 'history' of the yard. We ended up with edged, path sections cut into strips, running away of the buildings and plain setts/tiles in the building. A sheet of 2.5mm MDF was glued over the whole area to get the levels correct.


This is how Smooth-It is supplied.


Thursday 31st March

Worklist:
Wall piers
Capping balls
Equipment overhaul
Mine lighting switch
Workshop refurbishment

Geoff had painted and pointed the additional piers during the week and now glued them in place.


He then 'turned' his hand to making the balls for the cappings. Seaches for purchasable balls the right size and sensible prices having drawn a blank, he decided to make them himself. A form-tool was filed to shape in mild steel and a piece of nylon tried out. It wasn't a success as a smooth finish was not achievable. Aluminium, whilst not perfect, generated an acceptable ball.


Finally, some of the paint mixed for the bridge and rock-faces was applied to the balls and cappings.


The gates were all painted dark green, which set everything off nicely.


Laurence continued to refurbish tools from the workshop.

Stephen fitted two old slide switches to the wooden frame he'd made the previous week. This was fitted onto the mine baseboard, under the hillside, and the wires fitted. The mine lighting was successfully tested. The second switch is for the workshop lights - both room and brazier led's.


Stephen then glued the new 9mm ply wall parts to the workshop frame, which made everything quite rigid. The original holding-down bolts were refitted to the new front wall.