Wednesday 21st February

Worklist:
Wagons
Cassettes

The workshop was a hive of industry this week. Stephen and Geoff first discussed progress with their two sets of  wagons, explaining minor issues and workarounds with the various components. The general appearance was very encouraging.


Following discussions in the week, Kadee couplings and Peco Hardlon bearings had been ordered. However, Geoff confirmed Stephen's suspicions that the all-plastic Peco 'Wonderful wagon' wheels had been discontinued and explained it was due to standard axle lengths being lengthened. This resulted in basic Hornby wheels being ordered with a view to replacing the steel axles with 'homemade' brass alternatives. (The steel axles get attracted by the Kadee under-track magnets, which we're trying to avoid.) Fortunately, everything arrived at lunchtime.

A small discrepancy in the underframe jig had produced a few very slightly higher bodies that will simply require additional shims to keep the couplings at the correct level. Geoff had already adjusted the jig ready for the remainder of the wagons. Stephen used the corrected jig to assemble enough underframes to finish his wagons.


Geoff had augmented his set of jigs to include a 'coupling retaining-nut hole positioner'. This is required for the method he is employing to form the all-plastic full sub-frames. After a liberal dose of plastic cement, the M2 nuts are pressed and secured into the holes.


Geoff also had a session turning brass axles and swapping them for the steel axles in the Hornby wheel sets. (These will enable Stephen to progress his wagons in the week.)


This also enabled Geoff to assemble his first production wagon.


As well as keeping an eye on the wagon developments, Laurence progressed his work on the cassettes. Having completed the pair of jigs (or did he say fixtures?) he drilled holes in one end of a cassette.


He then cut a batch of MDF blocks, drilled holes and fitted 3mm brass pins in the first wooden block.


Following initial tests, discussions ensued about ease of inserting the blocks, their stability, future wearing of the holes etc. Damage to the end couplings of free-running stock was also discussed producing options for wooden blocks either side of the coupling knuckle or foam pads. All-in-all it was considered a job well done albeit another running session is now required to test them fully.


Wednesday 14th February

Worklist:
Wagon development
Cassette jig

Stephen had continued making ore wagons at home and discussed the issues with Geoff.

Self-adhesive card bolt heads had been a great success. Care was needed not to disturb those already in place, but with a bit of care and some appropriate work methods, damage was kept to a minimum. A spray coat of paint sealed them nicely when completed, although Geoff had started to apply paint by brush, as an interim solution.

Self-adhesive card detailing had been great for flat elements, but not those needing folding (angle plates) as they tended to delaminate (plasticard will be used). The end angles will also be made of plasticard, for strength. There were a few gaps in the 'palette' of components at present, but adhoc items were easy to make. Stephen preferred to make-up the sides and then drop a floor in, so remembering not to apply the internal details was imperative. Geoff, so far, has preferred to apply detailing the to sides prior to assembling the wagon - each to his own.

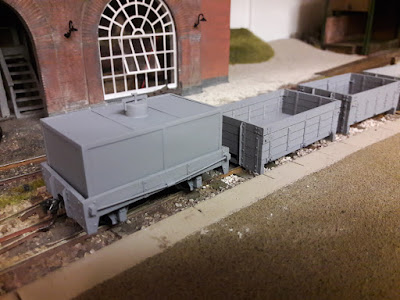
Stephen had also made a wagon he'd taken-to when researching the ore wagon design. The Ceiriog Granite Company was a private carrier on the GVT and notes were found referring to the practice of mixing stone and tar for various uses. The tar was brought in via tank wagon, although no photos were found. A simple design of a modified 1-plank wagon developed, with detailing from other tar wagons, mainly standard gauge. It had given the opportunity to 'finish' the key elements - couplings, underframes and wheels.


Stephen had purchased some M2 nuts & 6mm pan-head bolts. Several nuts had been 'captured' in a strip of plasticard and when cut to length, had been fixed to the wagon floor. The bolts needed to be filed down to 5mm.


However, when assembled and checked against the Kadee coupler gauge, the coupling was 1mm too high. The solution was a 1mm packer under the coupling box and the removal of a 1mm strip from the headstock opening. Geoff will amend his laser-cutting drawings to suit and make new ends. At least the 6mm bolts shouldn't need to be adjusted.

Stephen also had concerns about modifying and assembling the underframes on the wagon floor, ensuring they were aligned properly and dead-level. Although amazed that his first 'proper' attempt had worked so well, a rock-solid process was required. Geoff went into 'production manager' mode and produced two jigs.

The first held the solebar and axlebox sprue in place while assembling, and worked very well, speeding up the process considerably.


He then decided that the underframe assembly would be better if a complete sub-frame frame was formed separately. The second jig allowed this to be constructed accurately and quickly, which also worked well.


However, by now, Stephen had a rake of 8 wagons, with an incompatible floor construction, which required an alternative solution...

Laurence pressed on, making the jig for the cassette safety blocks.


Photo-call - Stephens current set of eight wagons with Geoff's latest 'jig-assisted' wagon on the end.


A three-plank round top wagon far left and two unpainted four-plank round tops add a bit of variety. The first unpainted wagon has card strapping and the others, plasticard.


One interesting and time-saving event had occurred following the last meeting. Geoff had the opportunity to photograph a standard gauge wagon and, in particular, several details that will be of great use. He was also able to answer a question we'd debated - what was the bolt head detail on the internal strapping? The answer was countersunk, which corresponded to the scored circles on the card straps, so NO bolt heads to apply inside!!!


Wednesday 7th February

Worklist:
Review wagon progress
Cassette jig

In the week, Geoff had been able to source some adhesive 'cardstock' sheets (US size) from 'Silhouette' and carried out various experiments.


He was able to produce a more than decent result.


The strapping detail was copied from the wagon drawings and assembled to produce a sheet for cutting in the new card.


Geoffs experiments had showed a 0.5 x 0.5 square for the bolts was a workable option. Other shapes i.e. hexagons and circles were possible, but not worth the extra cutting time. Panels of 10 x 10 bolts were produced and, using a scalpel tip, picked out and placed in position.


One problem found with scoring (light laser cutting into the surface) of external and internal planking lines was the basswood became very flexible and often broke. Geoff developed a closely spaced double-line detail that produced discernible planking without cutting too deep. At the same time, single lines produced an in-place template to position the card strapping details, all accomplished with one pass of the laser.


We now had a kit of parts of laser cut basswood body sides and card detailing. Some tweaking was still needed, but the basics were now established. 


Stephen had brought a set of wagons made from the basswood body parts to which he'd added plastic strapping.


He practised adding card bolts and happily took away several hundred to carry on. He also demonstrated his method of fixing Kadee magnets. This used an M2 nut let into a plasticard strip (drill hole, add copious liquid cement, allow to soften and press the nut into place in a vice). The Kadee slips in through the headstock and a 6mm x M2 bolt locates it in place. (A shallower pan-head bolt will probably be used). 


Geoff has an alternative idea for fixing the couplings, which he's working on - more anon.


While all this was going on, Laurence was finishing off the other half of his jig set for drilling holes for the cassette 'safety blocks'. Here soldering a location plate to the side of the main hole plate.


For information, the basswood by Mid West Products (USA) ordered through Amazon UK.


Wednesday 31st January 2018

Worklist:
Wagon progress
Main building
Cassette drilling jig

Stephen had produced a wagon based on the design he and Geoff had developed, which was inspired by the GVT 4 ton wagon body, but on a L&B style, low-slung underframe. Photos had been circulated over the previous week and given the 'thumbs-up'. As usual, Stephen had used 1.5mm plywood and plasticard detailing, including 0.5mm sq fixings. A spray coat of grey primer finished it off.


However, the plywood was not suitable for cutting on the laser cutter, so Geoff had been experimenting with other wood types. Balsa had proved easier to use than Obeche, but a pack of 1/16" x 6" wide Basswood sheets imported from the US was found to be extremely good and almost the same price of UK balsa! Geoff had finalised the drawings for the wagon bodies (one square end and one curved end design) and now produced samples of the cut-out wagon panel sheets for discussion.


As the underframe kits had arrived from Cambrian Models, packs of 5 were made up for Geoff and Stephen to assemble (then just another 8 to make). Stephen wanted to continue with plasticard external strapping/fittings and fixings. Geoff preferred to develop a set of laser-cut card strapping and also had ideas to produce the fixings using self-adhesive paper/card. He will report back in due course. He provided Stephen with a dedicated sheet of card fittings for possible use internally, to save time.


Stephen had been working on the main building, adding a range of details and finishes. All three bays were decorated, lighting fitted, doors applied, roof added and the stonework painted.


The office detailing comprised partition walls & doors, furniture & fittings, wall hangings etc. and grain-of-wheat lighting.


The office and garage bays - are individually switched.


The 'irregular' laser-cut roof slate strips had been glued onto the roof. The ragged edges and occasional offset slate worked perfectly.


The plasticard road paving sheets do not extend into the building. After discussions, it was decided to apply a layer of card to represent concrete, with a mock planked-over access pit in one bay. A threshold strip across the doorway might allow a pivot mechanism to be incorporated, for the doors.


The doors were a joint effort - Stephen produced a drawing, Geoff laser cut the sheet in two thicknesses of card and Stephen assembled and spray-painted them.


Unfortunately, the acrylic paint used for the stonework was not stable and rubbed off very easily. It will have to be removed and a better product investigated.


Laurence progressed the cassette retaining block system by fabricating a jig for drilling the holes in the cassette angles. Another jig to drill the drop-in blocks will follow.