Wednesday 19th July

Worklist:
Workshop
Crane

Usual tasks:-

Laurence continued with crane fitting - this week it was winch cabling.


Geoff finished off painting the doors and moved on to planning the interior detailing.


He and Stephen discussed the creation of a removable back-wall and floor to make fitting John's workshop equipment a bit easier. A laminated plasticard wall of embossed brickwork and backing sheet was made. This was sized to go in-and-out of the doorways to allow modifications/fitting after the building is bolted down (the missing top section is hardly visible and can be disguised with a painting scheme). After consideration, a raised floor was dismissed due to lack of working space adjacent the rails (for the workmen). Geoff cut out the plaster floor to allow the new floor to be added flush with the existing ground. This will be glued to the back-wall to make a single removable unit. The brazier flue will be modified to exit through the rear wall rather than the roof.

Stephen used a cigarette lighter to heat a length of 2.5mm dia plastic rod and create a swan-neck on the rainwater pipe. Thin electrical wires were twisted around the pipe to represent joints. The RWP was then glued to the gutter and the whole assembly painted.




Wednesday 12th July

Worklist:
Crane fitting
Workshop doors and gutters

Laurence continued with the crane leg foundations, turning the laminated wood blocks into concrete with plaster filler and acrylic paint.

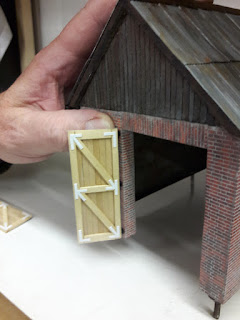
Stephen and Geoff continued working on the workshop. Geoff's doors were ready for a few details like bracing, metal corner brackets and hinges.


Meanwhile, Stephen continued with the 6" square section gutters, completing the details of end caps, joints and fixing brackets. The old half-round gutter at the rear was removed ready for the new one.


Wednesday 5th July

Worklist:
Crane fitting
Workshop

The heat and traffic reduced the general work output somewhat, although the session nearly didn't take place at all. The workshop has been suffering the attentions of a large, multi-stemmed tree growing next door. After years of wrangling it was due to be felled today, but an 'unauthorised' parked car stopped any work being carried out, which meant we could use the workshop. And so ...

Laurence progressed the foundations of the crane.


Geoff painted the corrugated iron roofing on the workshop.


Geoff then started to make a pair of hinged doors for the 'left hand' end of the building. Note the homemade cropping board. Geoff made us one each for use on small timber sections using single-sided razor blades. Also note the laser etched angular graduations.


Stephen, when he finally got into gear, started to make a pair of 6" square, metal gutters to replace the original, over-sized, half-round gutters. Temporary spacers hold the fabricated channel sections. Joints, brackets and downpipes will be added next week, if we're allowed in the workshop!


Stephen also brought along his Unimat SL lathe that had been unused for a decade or two. It was bought from a friend and he was convinced that it had a faulty chuck and so given up on it. The lathe in the workshop was a more than adequate substitute if any turning was required. However, recent events had stirred up an interest and the lathe was given the 'once-over' by Geoff who declared it in good order. A wash and brush up will be scheduled.


Wednesday 28th June

Worklist:
Crane fitting
Brazier
Workshop paining

Laurence continued mining into the grassy bank where the crane is being fitted. Wooden blocks representing concrete bases had been made and painted. Fine tuning ensured the crane legs where at the correct angle.


Stephen dismantled a battery powered, flickering tea-light into its component parts. The flickering was integral with the pale yellow LED, which made remodelling easier. The brazier (an original John Langridge item) had a 5mm hole drilled in the back to suit the LED. Wires soldered on the LED were extended into the scenery void behind the workshop. Initially, a power supply unit was going to replace the 2032 3v battery, but it was easier to reuse the original casing, battery and switch. Once tested, the LED was glued in place and 'coal' was glued over that. The gently flickering pale yellow light was perfect.


Geoff tackled painting the workshop brickwork to make it more realistic colour-wise, and to remove the sheen of the plastic. First an overall terracotta layer of paint, then flecks of darker and lighter hues. Geoff experimented with a technique he'd read about using white paint spread over the whole wall and the excess wiped off the surface, but he wasn't happy and removed it completely. A brief trial of Humbrol modelling filler rubbed into the joints went the same way. Finally, a mix of powdered filler and grey acrylic paint was applied all over. Once dry, this was rubbed off using a stiff brush - a stunning success.